


Welcome to my guide for the Guild Wars 2 raid boss, ![]() Sabetha the Saboteur (often shortened to Sab), the fourth and final encounter in Spirit Vale (Wing 1). This is a detailed guide on the mechanics of the fight including various strategies that cater to everyone from beginners to experienced raiders. If you’re brand new to raiding, I recommend reading my Path to Endgame guides first.
Sabetha the Saboteur (often shortened to Sab), the fourth and final encounter in Spirit Vale (Wing 1). This is a detailed guide on the mechanics of the fight including various strategies that cater to everyone from beginners to experienced raiders. If you’re brand new to raiding, I recommend reading my Path to Endgame guides first.
![]() Sabetha is the first boss with no
Sabetha is the first boss with no  Toughness tank; rather, her skills prioritize players based on proximity. She is also the first boss with specific roles for individual players. The roles are not difficult, nor do they make or break the fight, so this is good practice for future bosses with harder, more important roles.
The last mini-boss, ![]() Karde, takes 25% bonus damage from conditions, so having at least some
Karde, takes 25% bonus damage from conditions, so having at least some  Condition Damage can speed up that phase.
 Lean Techniques mastery.
  Glider Basics isn’t necessary unless you’re on cannon duty, but it can be helpful for everyone if your squad fails to break Lean Techniques is good for the players on cannon duty to have just in case they might glide back into
  Explosive Launch mastery. This is necessary to prevent cannon players from taking damage when being launched.
There are four mechanics that persist throughout the fight. I’ll go through these before going into each phase in detail.

![]() Sabetha is situated in the middle of a floating platform. She will never move from the center of the platform, no matter where any given player is located. If you fall from the platform, you will die.
Sabetha is situated in the middle of a floating platform. She will never move from the center of the platform, no matter where any given player is located. If you fall from the platform, you will die.
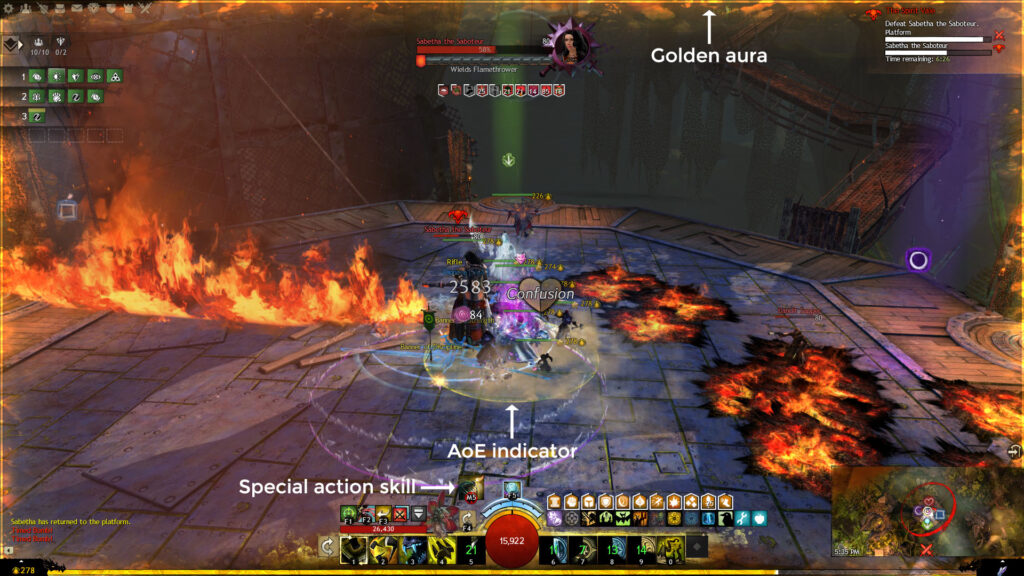
In the upper right-hand corner of the screen, you’ll notice an additional health bar for this encounter: the platform integrity. The platform is gradually destroyed in various ways throughout the fight. If the platform’s “health” reaches zero, the entire squad will fall to their deaths. Most of the platform damage is preventable and, unless your DPS is exceptional, you’ll need to utilize all of these methods so the fight doesn’t end prematurely.
When the platform integrity reaches 50%, the platform will change in appearance, gaining numerous scorch and skid marks.

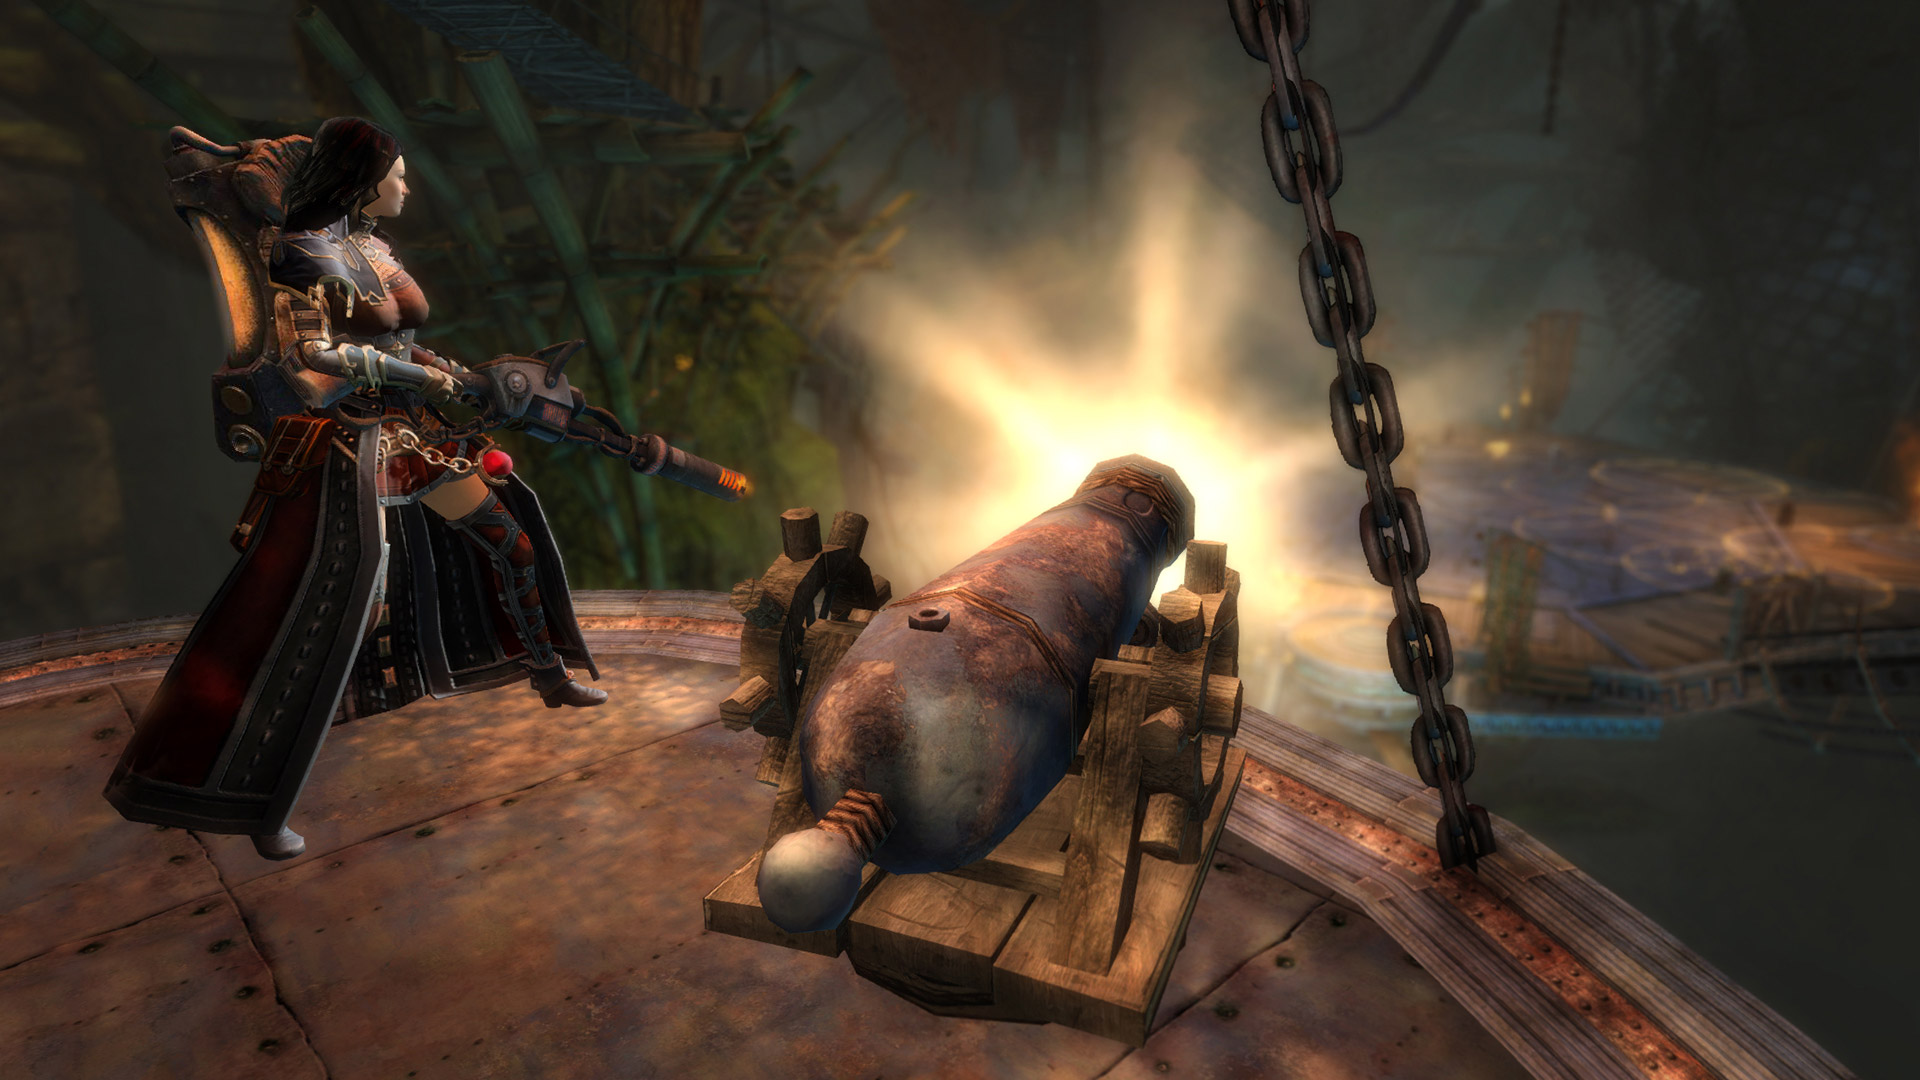
On the main platform, you’ll notice four launch pads in each of the cardinal directions. Above them are small platforms where cannons will spawn every 30 seconds throughout the fight. These cannons rain shots down, indicated by orange AoE circles, damaging players caught in the blasts and slowly but surely contributing to the platform's destruction.
At the same time, four enemies will spawn on the main platform. At least one of them will be a bandit sapper. These mobs throw sapper bombs at players, giving them the ![]() Sapper Bomb special action skill that lasts five seconds. This is indicated by a small green point-blank AoE, a golden aura around their screen, and the
Sapper Bomb special action skill that lasts five seconds. This is indicated by a small green point-blank AoE, a golden aura around their screen, and the  Sapper Bomb effect. As in the bandit tree fort mini-event prior to this fight, if the tagged player throws the bomb at a launch pad, any players standing on the launch pad will be tossed up to a designated spot. In this case, the small platforms the cannons are on.
When a player is launched they receive the debuff  Shell-Shocked, preventing them from being launched again within 50 seconds. Thus, you need two designated players alternating to take out a cannon each time one spawns. You should also choose a backup in case one of those players dies or is
 ![]() Downed when their cannon is up. Any build can be a backup in a pinch — healers obviously aren’t ideal since they’ll take longer to destroy the cannon, but a hybrid boon support will be more than adequate.
Downed when their cannon is up. Any build can be a backup in a pinch — healers obviously aren’t ideal since they’ll take longer to destroy the cannon, but a hybrid boon support will be more than adequate.
On a mini platform above each cannon is a bandit sniper. These snipers tag anyone who lands on the cannon platform, dealing increased damage to them as time goes on. They can be attacked, but it’s unnecessary and wastes time since the cannons are a higher priority. Power DPS players will need to stay on the platform to make sure the cannon is destroyed. Condi DPS can start gliding back when the cannon has as much as 50% health left, depending on how quickly they rack up conditions.
The sapper bombs can be baited pretty consistently by being the westernmost player, but still within range of the bandit sapper. Your kiter can take this on if they want since they’re moving around frequently anyway. Everyone still needs to keep their eyes peeled and be ready to move toward the active cannon. It is also possible for the person on cannon duty to get a ![]() Sapper Bomb and throw it at their feet to launch themselves. The throw’s AoE must catch both the player and the launch pad, even if it’s by a small margin, or they will not be launched.
Sapper Bomb and throw it at their feet to launch themselves. The throw’s AoE must catch both the player and the launch pad, even if it’s by a small margin, or they will not be launched.
If the bomb runs out or the throw misses the player, you may get another ![]() Sapper Bomb if a bandit sapper is still alive. It’s useful to kill only the bandit thugs and arsonists and leave the bandit sappers up for a little while longer just in case. If you do get another bomb, however, you need your designated backup to go to the launch pad instead of your regular two players. Otherwise, one of the players on cannon duty will still have Shell-Shocked when their next cannon is up, completely messing up the rotation.
Sapper Bomb if a bandit sapper is still alive. It’s useful to kill only the bandit thugs and arsonists and leave the bandit sappers up for a little while longer just in case. If you do get another bomb, however, you need your designated backup to go to the launch pad instead of your regular two players. Otherwise, one of the players on cannon duty will still have Shell-Shocked when their next cannon is up, completely messing up the rotation.
The cannons spawn in a fixed, alternating pattern:
To remember this, you can use an overlay that shows the directions and times on your screen. You can also have someone calling the cannons and/or put down squad markers at each launch pad.
Here are some tips for making sure you get your players up to the cannon every time:

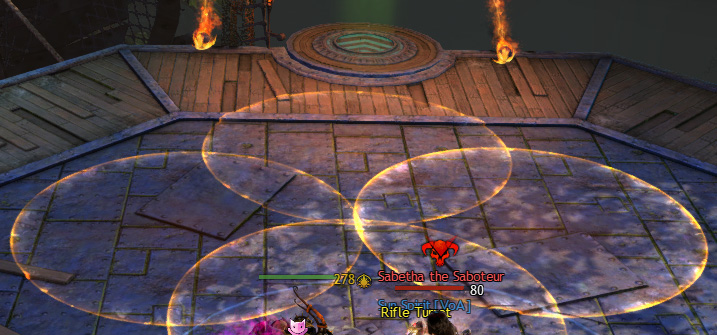
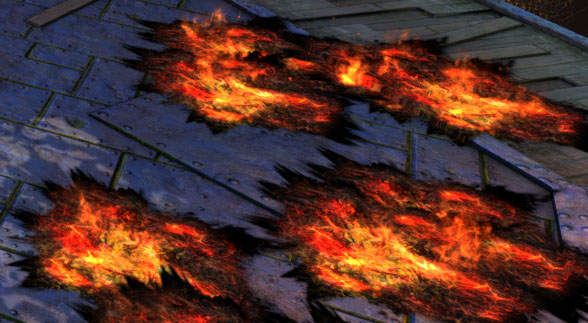
![]() Sabetha will turn to the player standing farthest away and aim flak shots at them. Their dispersion is random, but they will always be on top of or next to the player. The small fire fields pulse damage, inflict
Sabetha will turn to the player standing farthest away and aim flak shots at them. Their dispersion is random, but they will always be on top of or next to the player. The small fire fields pulse damage, inflict ![]() Burning, and persist for 25 seconds.
Burning, and persist for 25 seconds.
You need a designated kiter to bait ![]() Flak Shot. Anyone can do it since the flak can be avoided by sidestepping or
Flak Shot. Anyone can do it since the flak can be avoided by sidestepping or ![]() Dodging when you see the projectiles arcing toward your location. The best options are players with good ranged damage or a healer. Access to a movement or teleport ability is also ideal since you might need to get close to avoid
Dodging when you see the projectiles arcing toward your location. The best options are players with good ranged damage or a healer. Access to a movement or teleport ability is also ideal since you might need to get close to avoid ![]() Firestorm or move toward the opposite side of the platform to throw a sapper bomb.
Firestorm or move toward the opposite side of the platform to throw a sapper bomb.
The flak kiter can move to the middle of the platform on two different occasions. The first is when ![]() Sabetha performs
Sabetha performs ![]() Firestorm. The second is at 75%, 50%, and 25% when she disappears and one of her lackeys comes down.
Firestorm. The second is at 75%, 50%, and 25% when she disappears and one of her lackeys comes down.

Tells: Beep audio cue on tag, lit fuse sound effect throughout the duration, dynamite icon overhead, purple bomb icon on effects bar ( ), on-screen message: “Timed Bomb!”
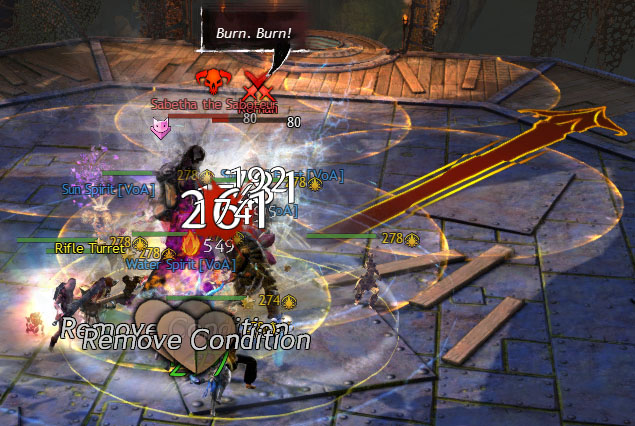
![]() Sabetha regularly tags the closest player with a time bomb that explodes three seconds later. The timer is indicated by the expanding orange AoE under the tagged player’s feet. When the dark orange circle meets the outer yellow ring, the bomb will explode. This deals only 2–3k damage to the player tagged with it, but massive damage to any other players standing inside it. It also kills
Sabetha regularly tags the closest player with a time bomb that explodes three seconds later. The timer is indicated by the expanding orange AoE under the tagged player’s feet. When the dark orange circle meets the outer yellow ring, the bomb will explode. This deals only 2–3k damage to the player tagged with it, but massive damage to any other players standing inside it. It also kills ![]() Downed players.
Downed players.
The tagged player should immediately ![]() Dodge away from the group and continue backing out until it explodes before running back into
Dodge away from the group and continue backing out until it explodes before running back into ![]() Sabetha. You can also double-dodge out if you need more leeway. Be careful not to go too far back, as you may catch your flak kiter or a cannon player in the explosion. It is always your responsibility to get away from other players if you have the bomb; you can easily cause several downs if you don’t move.
Sabetha. You can also double-dodge out if you need more leeway. Be careful not to go too far back, as you may catch your flak kiter or a cannon player in the explosion. It is always your responsibility to get away from other players if you have the bomb; you can easily cause several downs if you don’t move.
Since the bomb prioritizes the closest player, you can have a player bait the bomb by standing inside ![]() Sabetha's hitbox. If you do, choose someone whose rotation won’t be interrupted or compromised by moving away. However, two players will be tagged at the same time beginning at 50%, so this will only be useful during the first half of the fight.
Sabetha's hitbox. If you do, choose someone whose rotation won’t be interrupted or compromised by moving away. However, two players will be tagged at the same time beginning at 50%, so this will only be useful during the first half of the fight.

Also called: flame wall
Tells: ![]() Sabetha shouts, “Burn. Burn!”
Sabetha shouts, “Burn. Burn!”
Every 45 seconds, ![]() Sabetha chooses one player at random and draws a red arrow on the platform to their left. Shortly after, a flame wall appears, slowly rotating 360° counterclockwise. Players hit by this wall are instantly killed. You cannot
Sabetha chooses one player at random and draws a red arrow on the platform to their left. Shortly after, a flame wall appears, slowly rotating 360° counterclockwise. Players hit by this wall are instantly killed. You cannot ![]() Dodge,
Dodge, ![]() Evade,
Evade, ![]() Block, or go
Block, or go ![]() Invulnerable to avoid it. However, the temporary invulnerability granted when going down or after being resurrected will save you.
Invulnerable to avoid it. However, the temporary invulnerability granted when going down or after being resurrected will save you. ![]() Scourges casting are also protected as long as the skill was activated prior to contact with the flame wall. The most reliable way to avoid it is to sidestep to the left of the arrow and move about 45° to the right, following the wall’s progress for a few steps.
Scourges casting are also protected as long as the skill was activated prior to contact with the flame wall. The most reliable way to avoid it is to sidestep to the left of the arrow and move about 45° to the right, following the wall’s progress for a few steps.
The players in the most danger are the ones on cannon duty and the flak kiter. People on cannon duty should wait to go to their launch pad if the flame wall is close. You can make it if the flame wall is as few as ~90° away (at the previous launch pad position), but it’s risky. Also, watch for active flame walls when you’re returning from a cannon. If you’re afraid you might glide into it, try leaning back and orienting yourself so you land to the left of it. If there is someone calling on the main platform, you can also ask them to give you a heads-up about where ![]() Firestorm will stop so you know when it’s safe to start gliding back.
Firestorm will stop so you know when it’s safe to start gliding back.
Assuming ![]() Sabetha did not choose the kiter as
Sabetha did not choose the kiter as ![]() Firestorm's target, they should have time to run inwards on a diagonal. It’s impossible to outrun the flame wall on the outside of the platform since it catches up to you faster out there. If the kiter was targeted, they can try
Firestorm's target, they should have time to run inwards on a diagonal. It’s impossible to outrun the flame wall on the outside of the platform since it catches up to you faster out there. If the kiter was targeted, they can try ![]() Dodging to the left immediately or using a teleport or movement ability to reach the center.
Dodging to the left immediately or using a teleport or movement ability to reach the center.
The main phases, when your squad is focusing on killing ![]() Sabetha, are all basically the same. She alternates between using a low-damage shotgun blast and firing
Sabetha, are all basically the same. She alternates between using a low-damage shotgun blast and firing ![]() Flak Shot at your kiter every seven seconds. The first cannon spawn coincides with the first
Flak Shot at your kiter every seven seconds. The first cannon spawn coincides with the first ![]() Firestorm, so wait until it passes the launch pad to head out there.
Firestorm, so wait until it passes the launch pad to head out there.
There are three types of bandits that may spawn when a cannon becomes active every 30 seconds. Sappers throw the sapper bombs and though they attack with their pistols, are relatively harmless. Thugs kick players in melee range. If one spawns next to the kiter, they should get away as soon as possible or else risk being knocked off the edge of the platform. They can also kick players waiting for a cannon or knock people into a flame wall. Arsonists use a flamethrower attack. It does a respectable amount of damage but once they start it, they can’t turn, so step out of it. Players should aim to ![]() Pull these enemies in, ignoring the sapper if possible or holding their
Pull these enemies in, ignoring the sapper if possible or holding their ![]() Pull until after someone is tagged with
Pull until after someone is tagged with ![]() Sapper Bomb.
Sapper Bomb.
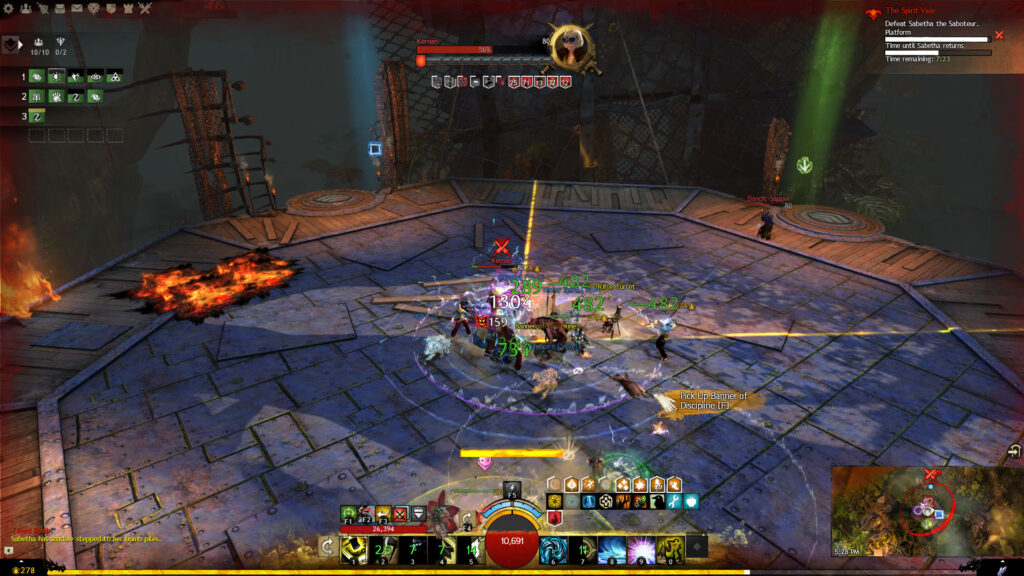
Every 25%, ![]() Sabetha will shadowstep away and call one of her lackeys:
Sabetha will shadowstep away and call one of her lackeys: ![]() Kernan,
Kernan, ![]() "Knuckles", or
"Knuckles", or ![]() Karde to the platform for an intermediate phase. If she is in the middle of
Karde to the platform for an intermediate phase. If she is in the middle of ![]() Firestorm, she remains vulnerable but finishes the attack, so make sure you still avoid it.
Firestorm, she remains vulnerable but finishes the attack, so make sure you still avoid it.
There is no flak, time bombs, or flame walls, but cannons will continue to spawn on their regular schedule. The people on cannon duty might find ![]() Sabetha on one of the platforms they’re launched up to. She poses no threat to these players.
Sabetha on one of the platforms they’re launched up to. She poses no threat to these players.
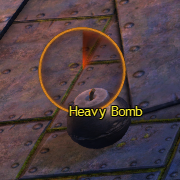
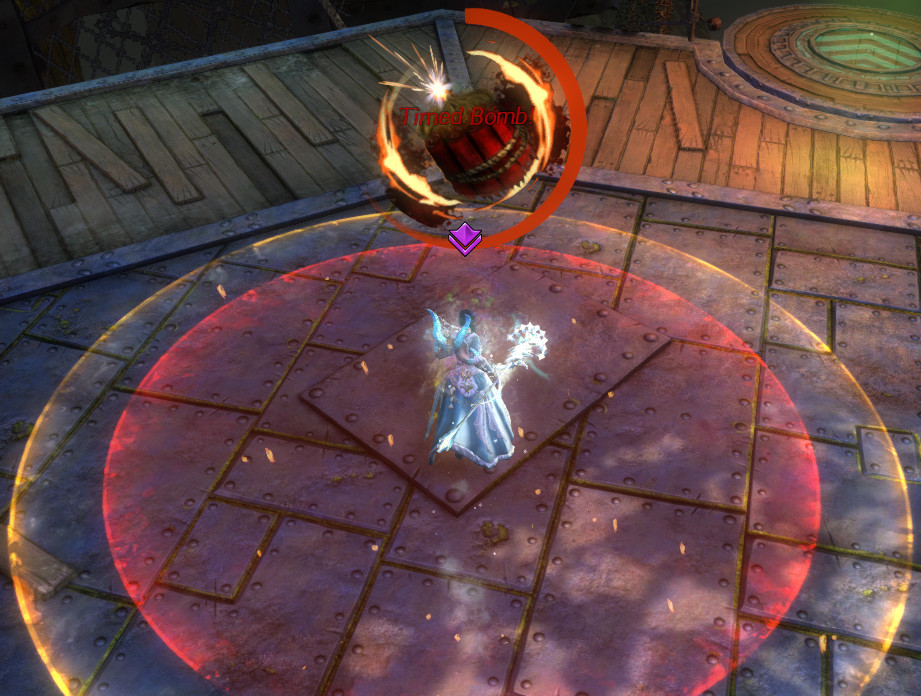
Rather, she focuses on throwing heavy bombs onto the main platform. These bombs spawn randomly and have a timer above them (![]() ) which fills up in 10 seconds. Players need to use their interact key to kick them off the platform. (You don’t actually need to be facing the outside of the platform; they disappear regardless.) If you take damage during the kick animation, you will be interrupted and need to kick it again. If you allow these bombs to explode, they do a huge amount of damage to the platform and knock back all players in range.
) which fills up in 10 seconds. Players need to use their interact key to kick them off the platform. (You don’t actually need to be facing the outside of the platform; they disappear regardless.) If you take damage during the kick animation, you will be interrupted and need to kick it again. If you allow these bombs to explode, they do a huge amount of damage to the platform and knock back all players in range.
![]() Sabetha returns to the platform when each lackey reaches 25% health or after one minute passes, whichever comes first. She will almost always perform
Sabetha returns to the platform when each lackey reaches 25% health or after one minute passes, whichever comes first. She will almost always perform ![]() Firestorm starting to the left of the entrance bridge as soon as she returns. Avoid this but keep your full attention on the champion until it’s dead, as things get very messy if you let her lackey pressure you while dealing with
Firestorm starting to the left of the entrance bridge as soon as she returns. Avoid this but keep your full attention on the champion until it’s dead, as things get very messy if you let her lackey pressure you while dealing with ![]() Sabetha's mechanics. Sabetha’s
Sabetha's mechanics. Sabetha’s ![]() Firestorm has an internal cooldown, meaning if she used it shortly before teleporting away and your squad has exceptional DPS, she might not use it immediately after she returns. She will still use it as soon as she is able, so be prepared.
Firestorm has an internal cooldown, meaning if she used it shortly before teleporting away and your squad has exceptional DPS, she might not use it immediately after she returns. She will still use it as soon as she is able, so be prepared.
Though ![]() Sabetha never moves, her three lackeys have a tendency to chase players, so stay in the center as much as possible.
Sabetha never moves, her three lackeys have a tendency to chase players, so stay in the center as much as possible.
At 75% health, ![]() Kernan comes out. Her deadly attack is
Kernan comes out. Her deadly attack is ![]() Hail of Bullets, a salvo of three consecutive pistol shots. The first shot is a 15° cone, the second is 30°, and the third is 45°. Each shot inflicts
Hail of Bullets, a salvo of three consecutive pistol shots. The first shot is a 15° cone, the second is 30°, and the third is 45°. Each shot inflicts ![]() Bleeding and does more damage than the previous. She does not change positions once she starts the attack, so you can run through her to avoid all the blasts. Otherwise, stay close to her so you can sidestep or
Bleeding and does more damage than the previous. She does not change positions once she starts the attack, so you can run through her to avoid all the blasts. Otherwise, stay close to her so you can sidestep or ![]() Dodge out of the thinnest part of the cone.
Dodge out of the thinnest part of the cone.
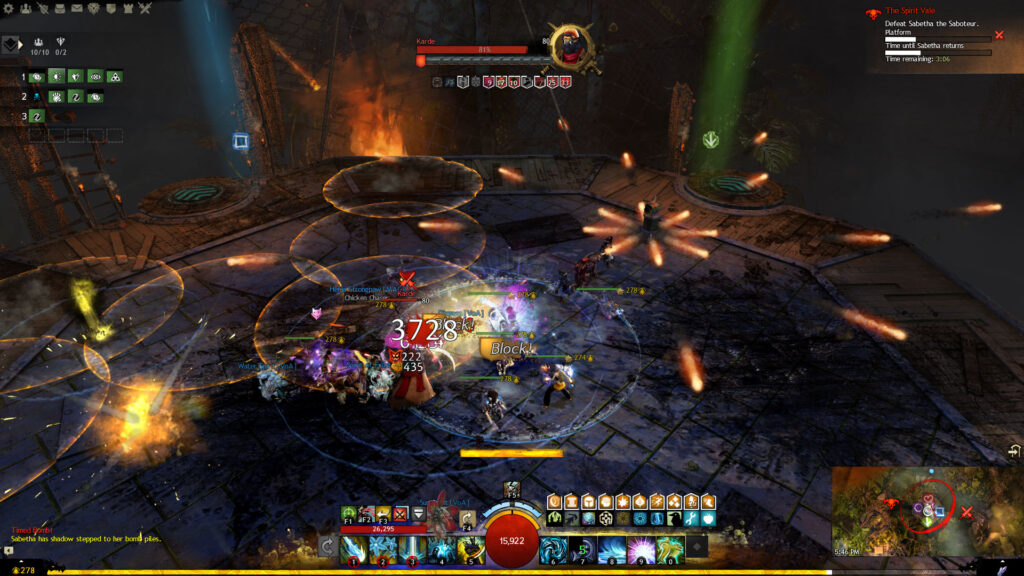
At 50%, ![]() Knuckles comes out. His deadly attack is
Knuckles comes out. His deadly attack is ![]() Platform Quake, a 360° hammer swing performed every 30 seconds. Players hit by this will be
Platform Quake, a 360° hammer swing performed every 30 seconds. Players hit by this will be ![]() Launched up in the air and
Launched up in the air and ![]() Knocked Back. You can prevent this attack by breaking his defiance bar when it becomes active. If you fail to break the bar, everyone in the center probably won’t be knocked off the platform, but players toward the outside are in danger of flying off the edge. You can potentially save yourself by gliding when the animation ends but don’t count on it. If every player has a little modest but fast-acting crowd control (CC),
Knocked Back. You can prevent this attack by breaking his defiance bar when it becomes active. If you fail to break the bar, everyone in the center probably won’t be knocked off the platform, but players toward the outside are in danger of flying off the edge. You can potentially save yourself by gliding when the animation ends but don’t count on it. If every player has a little modest but fast-acting crowd control (CC), ![]() Knuckles poses no threat.
Knuckles poses no threat.
After ![]() Sabetha returns, make sure you’re still watching
Sabetha returns, make sure you’re still watching ![]() Knuckles' defiance bar during
Knuckles' defiance bar during ![]() Firestorm. Since she’s now below 50% health, she will start tagging the two nearest players with a time bomb instead of one. Obviously, both players need to move away. Even if you have a designated kiter for the first 50%, everyone will need to pay attention at this point so as not to jeopardize their allies.
Firestorm. Since she’s now below 50% health, she will start tagging the two nearest players with a time bomb instead of one. Obviously, both players need to move away. Even if you have a designated kiter for the first 50%, everyone will need to pay attention at this point so as not to jeopardize their allies.
At 25%, ![]() Karde comes out. His deadly attack is
Karde comes out. His deadly attack is ![]() Flame Blast, an ongoing flamethrower barrage that does a lot of damage and inflicts
Flame Blast, an ongoing flamethrower barrage that does a lot of damage and inflicts ![]() Burning. If you get hit by the entire attack, you will almost certainly go down. Like his lowly arsonist brethren, he is incapable of repositioning during the attack, so step out of the line of fire.
Burning. If you get hit by the entire attack, you will almost certainly go down. Like his lowly arsonist brethren, he is incapable of repositioning during the attack, so step out of the line of fire.
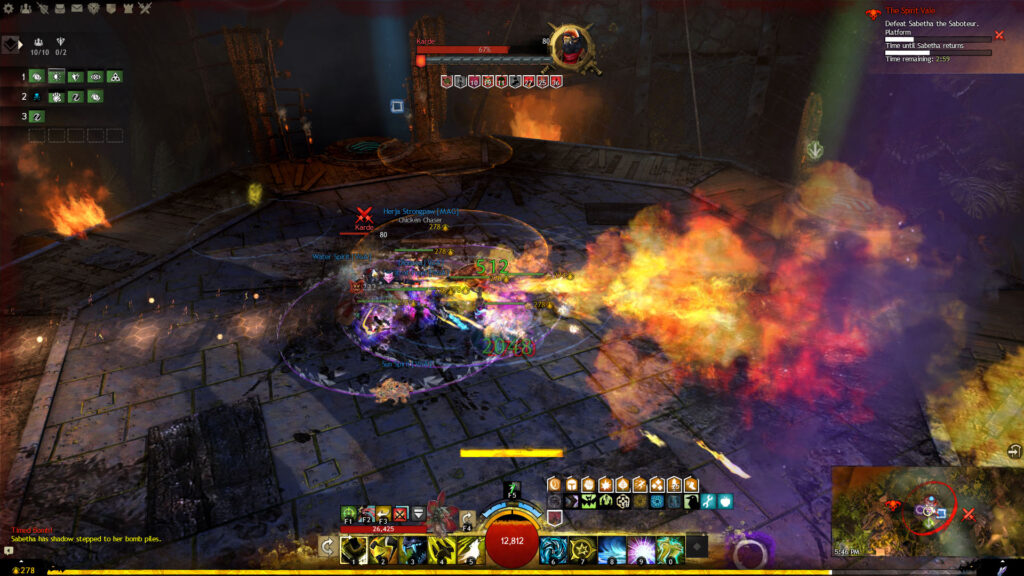
![]() Karde also ups the ante by creating
Karde also ups the ante by creating ![]() Flame Turrets at random places on the platform. These shoot out eight slow-moving fiery projectiles in a star pattern. One turret isn’t very dangerous, but ignore them and you’ll find yourself overwhelmed. will destroy them nigh instantly, but otherwise, if every player throws a couple of attacks at them, they’ll go down fast.
Flame Turrets at random places on the platform. These shoot out eight slow-moving fiery projectiles in a star pattern. One turret isn’t very dangerous, but ignore them and you’ll find yourself overwhelmed. will destroy them nigh instantly, but otherwise, if every player throws a couple of attacks at them, they’ll go down fast.
After ![]() Sabetha returns at 25%, she gets desperate and
Sabetha returns at 25%, she gets desperate and ![]() Platform Crush will be in effect for the rest of the fight. Debris will start to rain down on the platform, damaging it slightly. Players can stand in the small AoE circles, getting hit and taking a couple thousand damage, but saving the platform’s integrity in the process. Players are generally encouraged to take a few of these hits if possible, especially if the platform is close to destruction, but not to their own detriment.
Platform Crush will be in effect for the rest of the fight. Debris will start to rain down on the platform, damaging it slightly. Players can stand in the small AoE circles, getting hit and taking a couple thousand damage, but saving the platform’s integrity in the process. Players are generally encouraged to take a few of these hits if possible, especially if the platform is close to destruction, but not to their own detriment.
Things can seem quite chaotic in the last phase with so many AoEs everywhere but don’t panic. Stick with your group, keep up your skill rotation, and you’ll have her dead in no time.
If you don’t kill ![]() Sabetha within 9 minutes, she becomes
Sabetha within 9 minutes, she becomes ![]() Enraged, does 500% more damage, and all four cannons will spawn, regardless of which were active when the timer hit zero. It’s not technically a hard enrage, but your squad likely won’t survive long. If the platform integrity reaches zero at any point during the fight or post-enrage, your squad will wipe.
Enraged, does 500% more damage, and all four cannons will spawn, regardless of which were active when the timer hit zero. It’s not technically a hard enrage, but your squad likely won’t survive long. If the platform integrity reaches zero at any point during the fight or post-enrage, your squad will wipe.
About Phoenix Uprising • Recurring Series • Support the Site • Contact • Editorial Guidelines • Privacy Policy
© 2022 Phoenix Uprising. All rights reserved.
About Phoenix Uprising • Recurring Series • Support the Site
Contact • Editorial Guidelines • Privacy Policy
© 2023 Phoenix Uprising.
All rights reserved.