

Welcome to my guide for the Guild Wars 2 raid boss,  Xera, the fourth and final encounter in Stronghold of the Faithful (Wing 3). This is a detailed guide on the mechanics of the fight including various strategies that cater to everyone from beginners to experienced raiders. If you’re brand new to raiding, I recommend reading my Path to Endgame guides first.


Xera is a boss that focuses on intuitive movement and the quick and efficient completion of mechanics. As long as you’re performing them adequately, DPS should be fine. It’s beneficial for all DPS players to have a strong ranged weapon or ranged skill options.
 Ley Line Gliding mastery. This is required for everyone in the squad to get from platform to platform.
 Forsaken Magic mastery. This isn’t required but is recommended for everyone in the squad to have to more effectively reduce their stacks of
  Derangement, a mechanic like
  Madness from the Twisted Castle. Xera's defiance bar about once every minute during the main phases.
 Condition Cleanse: Conditions can be caused by Xera herself, stacks of Derangement, and the White Mantle adds, so it’s useful to have some cleanses at the ready.
 Pulls: This can help group up White Mantle enemies so they can be cleaved down, and optionally used on the unstable rift mini-games.
Throughout the fight, various attacks and mechanics will give players a stacking debuff called Derangement. This debuff acts similarly to Madness in the Twisted Castle, applying new effects every 10 stacks. However, unlike Madness, players do not gain Derangement passively and Derangement only applies conditions, it never inflicts damage. You can monitor the number of stacks you have by looking at the yellow icon on your buff bar.
The table below lists the different effects. The conditions are additive, meaning once a condition is applied for the first time, it will be reapplied along with any new conditions at each interval after that. At 30 stacks, you’ll also receive a bloodstone shard icon over your head, which will change color at subsequent intervals.
| Stacks | Effect | Icon |
| 10 |
 Vulnerability (10 seconds) Vulnerability (10 seconds) |
|
| 20 |
 Crippled (10 seconds) Crippled (10 seconds) |
|
| 30 |
 Confusion (10 stacks for 10 seconds) Confusion (10 stacks for 10 seconds) |
 |
| 40 | No new conditions | |
| 50 |
 Torment (10 stacks for 10 seconds) Torment (10 stacks for 10 seconds) Weakness (10 seconds) Weakness (10 seconds) |
|
| 60 | No new conditions |  |
| 70 | No new conditions | |
| 80 | No new conditions | |
| 90 |
 Fear (10 seconds) Fear (10 seconds) |
 |
| 99 |
 Instant defeat Instant defeat |
You can remove Derangement by standing near bloodstone shards and fragments when they’re destroyed. This will remove six stacks normally, but eight stacks if players have the Forsaken Magic mastery.
Players will begin on a small platform with a ley rift, which overlooks the ‘arena’ of six larger numbered floating platforms arranged in a circle. An illusion of Xera awaits on Platform 1 below. This illusion will never attack players, even when you engage it, so you can glide down. When you kill the illusion, the fight begins.
Your squad will need to split up evenly, with half going left, and half right. The easiest way to do this is by subgroup. On each platform, both groups will be completing a mini-game to remove the shield bubble around the bloodstone shard and destroy it. Traps will not trigger on the shards but can sabotage future attempts if you wipe, so avoid putting them down. This will create a ley line to the next platform with a different mini-game, but the same goal. Once both groups are finished, they will reconvene on the platform opposite the first.
The bloodstone shards release projectiles that inflict Confusion. Do not stand in the shard’s hitbox or else you’ll eat all the projectiles and potentially rack up 50+ stacks of Confusion, nigh instantly  Downing you. When the shard’s shield is up, it prevents the projectiles from escaping it, although anyone standing in the shield can still be hit. When the shield is down, the projectiles can travel to the outside of the platform.
Players have ~30 seconds from the time a player lands on the platform to destroy the shard. At this point, Xera will start to encase the platform in ribbons, which deal heavy damage over time to any players left on it. The platform timers work in sets, meaning if one group finishes the first platform quicker and glides to the second prematurely, this will leave the other group with less time to complete the second.
On all four of these platforms, players will very slowly rack up Derangement regardless of where they stand, but some stacks (potentially all depending on how long you take) will be removed when you destroy the shards.
Seven seconds after the fight starts, ley lines will spawn from the first platform to the two side platforms. This mini-game is similar to the ley rift phase from Keep Construct. Players must push three exquisite conjunctions (orbs) into three different unstable rifts to bring down the shield. It doesn’t matter which orb goes into which rift, although players usually agree to push clockwise to make it simple. You can push the orbs using any direct damage, but they are also susceptible to hard CC, so you can Pull or use a  Knockback to get them into a rift if you wish.
To make this trickier, three smoky purple clouds indicated by orange AoEs also circle around the platform. If an orb is pushed into one of these AoEs, it will disappear and you will have to wait a few seconds for it to respawn. Squads typically assign three players from each subgroup to push beforehand to ensure the orbs don’t ping pong across the platform or get lost in an AoE. Note that pets, minions, and trap skills can accidentally push the orb off course.
When the third orb is pushed in, the shield will disappear and the bloodstone shard will become vulnerable. Destroy it, avoiding the projectiles, to spawn a ley line leading to the next platform.
For this mini-game, three people must stand on three different pressure pads, evenly spaced around the outside of the platform. The shield will be down for as long as players are standing on all three pads at the same time.

The trick is that each player standing on a pressure plate will receive a stacking Chaos debuff. The debuffs have different names depending on which pad you’re standing on ( Bending Chaos,
  Shifting Chaos, or
  Twisting Chaos) but they all function identically. You receive one stack per second for as long as you’re on a plate and will go Down when you reach 10 stacks.
The typical strategy is to assign three players per subgroup beforehand, ideally, support players or DPS with good ranged options. One person taking a pressure pad will call when all three can step on so the stacks increase evenly, and then at eight or nine stacks, tell them to rotate or swap. The players will then rotate clockwise and stand on that pad instead. Since the debuffs are unique, players can accumulate separate stacks safely. The remaining two players can DPS the shard in the center, taking care to avoid the projectiles.
Squads with good DPS can destroy the shard before players acquire 10 stacks, but groups with lower DPS might need to rotate once. Generally, you shouldn’t need to rotate twice unless people go Down and you spend time resing.
As before, a ley line will spawn leading to Platform 4 where the groups will reconvene.
The squad can stand on the outside of Platform 4 facing northeast (toward the platform you started on) and start stacking boons and topping off everyone’s health. A few seconds later, a seventh larger platform will spawn in the middle of the area along with a ley line connecting it to Platform 4. This is the main platform, where the fight against Xera will take place.
Xera aggros on the player with the highest  Toughness. Your tank’s positioning is crucial in this fight. There is a section at the end of the guide explaining where to move her at various points, but first, you should understand why you need to move her.
Xera has one major attack called Confounding Frenzy, which is similar to a  Mesmer's (Sword 2). Xera slashes rapidly eight times, each hit giving players three stacks of Confusion, meaning being hit with every strike will rack up a mean 24 stacks. This attack cleaves, meaning everyone but the tank should be standing behind Xera. The tank can avoid this by
  Blocking,
  Evading, or
  Dodging backward, as she cannot move while performing this attack. If your tank has enough Toughness, they can also eat the attack or outheal it and cleanse the Confusion.
Sometimes Xera will stand still, lift one arm in the air, and her defiance bar will unlock, allowing you to CC her. For as long as her break bar is active, she will take 80% less power and condition damage. In addition, the bloodstone fragments described below will (re)spawn faster. As such, you should break the bar as quickly as possible.
Throughout the phase, sometimes a large black and magenta orb will spawn, heralding the arrival of a few random White Mantle enemies with their respective attacks, and some of Xera's phantasms, which inflict Vulnerability, Confusion, and Torment. Both of these adds can be Pulled in and cleaved or killed with AoEs.
At 75% health, four of Xera's large marionette-like constructs will appear in the air around the platform. Everyone in the squad will get a message on their screen saying “[Player name] has harnessed ambient magic.” Shortly after, there will be another message stating “ Xera is poised for a deadly attack.” Finally, the marionettes will draw back their right arm and then thrust it out, creating a white explosion on the platform. This explosion will instantly kill any unprotected players on the platform.
The player who harnessed ambient magic will receive a special action skill,  Intervention, which will create a shield bubble when deployed. The only way to avoid the attack is to stand in this bubble. The bubble only lasts five seconds, but there is a 10-second delay from the message until the attack. This means deploying the shield instantly will cause it to disappear before the attack goes off, meaning your squad will wipe.

The player with Intervention must resist the trigger finger temptation and wait a few seconds to use it. There are a few ways to know when to use it: your commander might call out; some players like to count to seven when the message appears and then use it; some may rely on the marionettes’ visual tell of pulling their arm back. After you do the boss several times, you’ll probably develop an intrinsic notion of when to use it.

The main platform has 12 delineated segments, with a Krytan numeral marking each. A bloodstone fragment will spawn in each of the segments in a clockwise order, starting on the segment you glided in on. The fragments emit a large PBAoE, each of which covers a single segment to either side. If players stand in the AoE, they rack up one stack of Derangement per second. If Xera, her illusions, or the White Mantle stand in the AoE, they gain  Bloodstone Blessed, a buff that increases outgoing damage by 100% and converts conditions into boons.

You can destroy the fragments, and standing in their AoE when you do will remove some stacks of Derangement. Keep in mind that you must clear at least three fragments to gain a single safe segment to stand on. A small area in the center of the platform will always be clear, but while the laser mechanic below is active, it will be dangerous to stand there.
Every 30 seconds after Xera spawns, half the platform will be covered in a blurry pink and purple AoE, similar to a  Chronomancer's . Seven seconds later, anyone standing in the AoE will take heavy damage, be
  Floated for three seconds, and accumulate 25 stacks of Derangement. As players will pass 2–3 Derangement thresholds, they will also obtain multiple conditions.

Because of the numerous effects, it’s likely any player caught in the well will go Down. Fortunately, there is plenty of time to run out of the AoE. If the well is right next to the stack, be careful with your positioning, especially on builds with movement abilities or those that need to Dodge to maintain DPS.
The AoE has four patterns it cycles through in order. It will roughly cover the platform in each of the cardinal directions but offset to the right by one segment or 30°. In this phase, the order is east → north → west → south.
If you’re in the 10-second window when Xera is about to use her deadly attack, the pattern that would occur during this time will be skipped.

Forty seconds after Xera spawns, a pink beam will strike down in the center of the platform. This laser shoots out red orbs. If these orbs hit a player, they will take moderate damage, be Floated for one second, and receive six stacks of Derangement. A small red-ringed temporal vortex will also spawn at their feet. This AoE pulses and any players caught in a pulse will gain two stacks of Derangement. The beam lasts 25 seconds.
If you’re in the 10-second window when Xera is about to use her deadly attack, the laser will be skipped. If she uses it while the laser is active, the beam will disappear early. A new laser will appear 40 seconds after the last one disappeared.
Standing in or near the laser will cause players to be hit by the majority of orbs, meaning sometimes you need to clear the fragments on the outside of the platform. The tank will then have to guide Xera out to the edge so everyone can strafe and avoid the orbs.
If your squad can DPS Xera to 75% within ~40 seconds, you can remain in the center during the entirety of Phase 2. You can survive in the middle for a few seconds if the laser spawns, so you have some leeway in making this DPS check, but more time than that will result in Downs.
When Xera reaches 50% health, she will despawn and the outer ring of platforms will reappear. Three flashing red arrows will direct you to glide back to Platform 4 using the ley line. A bloodstone fragment on Platform 4 will spawn ~15 seconds after the phase begins and the main platform will begin to blur and disappear at the same time. Anyone who failed to glide over will fall to their death.

The goal of this phase is to destroy a bloodstone fragment on each platform to manifest a ley line and glide to the next clockwise platform (4 → 5 → 6 → 1 → 2 → 3 → 4). Standing near these fragments when you destroy them does not decrease your Derangement stacks. You have ~20 seconds to destroy a fragment before Xera encases the platform in ribbons, which, as in Phase 1, will deal heavy damage over time to any players remaining on it.
Each platform except 4 will have one of four randomly generated configurations of raised sections. This can include the center, pieces of the outer ring, entire 30° segments, etc. Most are just annoying, necessitating you run around to get a line of sight (LoS) on the fragment or jump several times to get across the platform. But sometimes the ley line to a platform will end at a section of raised outer wall, meaning you’ll need to glide left or right at the end of the ley line to land.
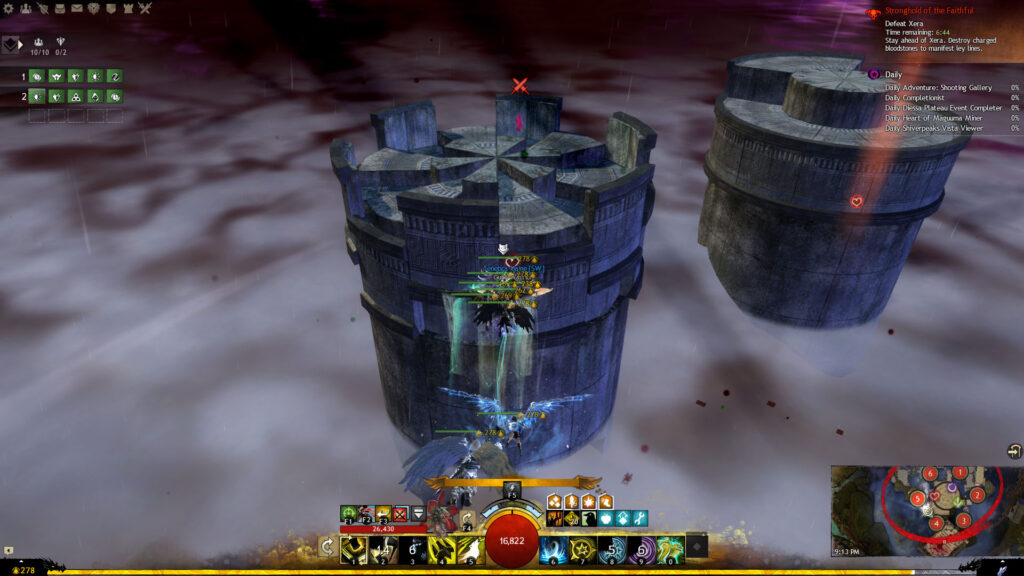
In one configuration, the platform forms a series of steps to a higher section where the fragment is. On these platforms, you don’t need a ley line to glide to the next since you gain so much height climbing the steps. In this case, you can either destroy the fragment or ignore it and glide straight to the next one. This can be helpful if you’re running out of time. However, if you run into this configuration on Platform 2 or 3, be aware that ribbons might be wrapped around the next platform. In this case, make sure you don’t glide over early if you’re opting to disregard the fragment.
When the first player lands on a platform, gold circles will start to haphazardly appear. After a second, they will explode and create a pulsing AoE of bloodstone fragments indicated by a red ring. These disappear after three seconds. Both the initial explosion and each pulse will inflict two stacks of Torment and increase Derangement by two stacks. Be careful about being hit by too many of these, especially if you’re near a Derangement threshold, as you’ll always be Crippled when you reach one, making it likely you’ll be hit by more AoEs and fall behind.
Phase 4 is largely the same as Phase 2, but there are minor changes to some mechanics:
Xera reaches 40% and 20% health instead of once.In addition to these alterations, at 40% and 20% health, half the squad, chosen at random, will be teleported to a floating platform. This platform is higher up so everyone can see what’s going on on the main platform but has a barrier that prevents anyone from gliding back down. The only two people who cannot be teleported are the tank and the player who received the special action skill.
At 40%, players will have to do the first mini-game they encountered in the pre-phase with the rifts, while at 20% they will need to perform the second with the pressure pads. Both mini-games work exactly the same, except you’ll need to assign people on the fly and you have two minutes to complete them instead of 30 seconds. Nevertheless, you should try to finish as quickly as possible since the players left on the main platform will feel a lot of pressure from the adds and trying to break Xera's defiance bar.
One player on the floating platform can use the mini mesmer portal to get back to the main platform if needed. Generally, a healer will use this if both healers were teleported. Otherwise, it should be safe for everyone to stay unless the main platform is in dire straits.
Once the bloodstone shard is destroyed, everyone remaining on the floating platform will be teleported back to the outside of the main platform. They will have  Hero's Return, a 10-second buff that prevents them from accumulating Derangement stacks, renders them
  Invulnerable to being Floated, and halves all incoming damage.
Because half your squad is teleported away twice during this phase, you won’t have the DPS to stay in the center the whole time even if you did in Phase 2.
If you don’t kill Xera within 11 minutes, she becomes enraged and does 200% more damage.
 Xera in one of the numbered spots in the center, always face her toward the marker on the outside.
 Circle. Circle.
 Arrow on the south side of the line. You might get a wall on the N side. Circle marker. Circle. You should phase her to 50% at this point. Circle.
 Heart on the south side of the line. You might get a wall on the N side. Arrow. The squad should clear the Circle marker. Circle on the west side of the line. You will get a wall on the E side. You might get a wall on the W side after. Scooch to the left if this happens. Arrow. The squad should clear the Arrow marker. Arrow on the north side of the line. You might get a wall on the S side. You should kill her at this point, but if not…
Go to tank spot 1 with your back to Circle.
About Phoenix Uprising • Recurring Series • Support the Site • Contact • Editorial Guidelines • Privacy Policy
© 2022 Phoenix Uprising. All rights reserved.
About Phoenix Uprising • Recurring Series • Support the Site
Contact • Editorial Guidelines • Privacy Policy
© 2023 Phoenix Uprising.
All rights reserved.