



Welcome to my guide for the Guild Wars 2 raid boss,  Slothasor (often shortened to Sloth), the first encounter in Salvation Pass (Wing 2). This is a detailed guide on the mechanics of the fight including various strategies that cater to everyone from beginners to experienced raiders. If you’re brand new to raiding, I recommend reading my Path to Endgame guides first.


Slothasor is one of the most difficult first bosses in a raid wing. More so than others, it is a fight that rewards you for having higher DPS since the end of the fight is more hectic than the beginning. Generally speaking, power DPS is better because of the short phases, but some builds with conditions that ramp up quickly can serve well too.
 Aegis,
  Block,
  Stability, and/or
  Stun Break: You need one or more of these boons/abilities to deal with Slothasor's roar. Slothasor's defiance bar five times, and since the bar has 4,000 strength, it is one of the most CC-demanding raid bosses.
 Condition Cleanse: There are a lot of outgoing conditions, so the more cleanses, the better.
 Projectile Destruction: You can destroy and reflect some of the slublings’ spit attacks.
 Pulls: The best way to deal with the never-ending parade of slublings is to pull them in and cleave them down.
 Revival: This is a damage-heavy fight and it’s likely players will go
  Down in a bad spot because there can be a lot of movement, so high revivability is welcome.
Slothasor is sleeping in a cave covered in green poison fields. These fields emanate from pink mushrooms spread throughout the arena. They rack up damage and  Poison stacks.
Players cannot damage or destroy the pink mushrooms but can eat them as a slubling. When a mushroom is eaten, its poison field will also disappear, allowing players to safely stand in that area. Poison mushrooms respawn 60 seconds after being eaten.

Blue glowing Imbued Mushrooms spawn counter-clockwise in one of four fixed locations every 50 seconds. It may help to put markers on the spawn locations. The first Imbued Mushroom is at the entrance to the arena. Eating it wakes up Slothasor, starting the fight. Shortly after, a rock wall forms at the entrance, preventing players from exiting the designated arena.
When a player eats an Imbued Mushroom, it disappears and transforms that player into a slubling for up to 45 seconds. In this form, players have a skill called  Eat, which allows them to eat pink poison mushrooms.
Your friendly slubling player will also become a targetable, damageable enemy to the squad and an ally to Slothasor and its slublings. The friendly slubling’s health pool is increased to 50k, but they will retain their health percentage from the moment prior to being transformed (e.g. if they had 70% of their health remaining, they will have 35k HP). It is still important not to attack them or use AoEs when they are nearby. Pulls and are especially dangerous. If a player loses all their health as a slubling, the transformation will end and they will go Down on the spot.
Generally, friendly slublings should aim to eat three to five poison mushrooms while they’re transformed, creating a safe path to the next Imbued Mushroom spawn spot. When they finish eating all the poison mushrooms, they can end the transformation using skill 5,  Return.

When the player eats an Imbued Mushroom, they grow  Nauseated, an effect that prevents them from eating another Imbued Mushroom for 3:15 minutes. Mousing over the purple vomiting emoji icon on the buff bar will display the remaining time. There are a few different strategies you can use to deal with the mushrooms and playable space.
For the circle strategies, your group will rotate from one tanking location to another, going in a rough circle around the room. The eaters shouldn’t eat too many mushrooms ahead of the group (as above, stopping at the next Imbued Mushroom is usually sufficient). Eating too many means you’ll have more playable space initially, but less in the future as the pink poison mushrooms start respawning. You also might force another eater to go back through poison to reach their Imbued Mushroom. Either of these strategies is good for pick-up groups or general progression and clear groups.
Wall Strategy
For this strategy, you’ll need to assign one player to eat each Imbued Mushroom and an additional player as a backup. The slublings will eat poison mushrooms along the cave walls to forge a path to the next Imbued Mushroom.

This is the safest strategy mechanics-wise, but since the circle you create is very wide, Slothasor will move a lot, so your DPS may suffer.
Hybrid Strategy
As in the wall strategy, you’ll assign one player to eat each Imbued Mushroom. The slublings will instead eat poison mushrooms around the center of the room, usually leaving a ring of green poison against the walls. This is sometimes known as the hourglass strategy due to the shape of the path.
This isn’t as safe as the wall strategy, but since the area you create is narrower, Slothasor will move less, so you’re likely to kill him faster.
For the standstill strategies, your group will eat a few (or no) mushrooms and move as little as possible. Instead of moving in a circle, the group will cluster in a small area of playable space. Both of these strategies should only be attempted with exceptional DPS and a mechanically sound group. Many things can go wrong with so little space to move and players can take a lot of damage if they have to stand in the poison fields at any point.
Center Strategy
The center strategy starts out similar to the hybrid strategy in that the first mushroom eater will clear a couple of mushrooms into the middle of the room, allowing the group to move out from the entrance. However, they will only eat about one-third or halfway to the second Imbued Mushroom. The second eater will need to dodge or use a movement skill to get to that Imbued Mushroom when it spawns and then double back toward the group to clear a few more mushrooms into the room. Eaters will also typically wait a few seconds before eating the final mushroom so they don’t all respawn one right after another, giving you more leeway in the last area cleared.

Your DPS should be high enough that you only need to eat two or three Imbued Mushrooms during the fight. In fact, this strategy usually follows having high DPS as opposed to the reverse since Slothasor will fall asleep more frequently with higher DPS, meaning you might get trapped in poison if Slothasor gets animation-locked during the time he is awake. This strategy is typically only used for fast clears in experienced groups and guilds.
No Mushrooms
One player will eat the first Imbued Mushroom to start the fight, but then they will end the transformation. The entire fight will take place in the tiny safe area between the wall and the start of the green poison. Alternatively, your squad can stand in the green poison field and opt to outheal the damage.
This strategy is extreme, gimmicky, and dangerous. It is almost never used for run-of-the-mill clears.
Enemy slublings spawn in groups of five every 30 seconds. They spit projectiles that inflict various conditions. When no allied slublings are eating, these enemy slublings should be Pulled to Slothasor and cleaved down. Useful skills for this include (Focus 4), (Greatsword 5), (Axe 3), (Axe 4), and (Greatsword 5). If friendly slublings make it dangerous to Pull, use Projectile Reflection, destruction, or conversion such as , , or (Staff 5).
Evolved slublings begin spawning when Slothasor is at 30% health. Their projectiles inflict conditions and many also corrupt boons. The volleys can’t be Reflected, destroyed, or converted but the single projectiles still can. If you can’t Pull them in, it’s more effective to focus on the boss since the Evolved slublings will keep spawning. This is crunch time. Groups that have higher DPS and managed to keep all their players alive will have an easier time of it.
Tells: Beep audio cue on acquisition, green skull icon overhead ( ), purple icon with three slashes on effects bar (
 ), on-screen message: “Volatile Poison”
Every 25 seconds, starting at 6:35, Slothasor will tag a random player with volatile poison, which deals a flat 750 damage per second to that player. They will gain a special action skill,  Purge, allowing them to drop the poison at their feet. Otherwise, it will drop on its own in eight seconds when the effect expires. The poison will also drop if the player is Downed or eats an Imbued Mushroom. If a player is about to eat when they get volatile poison, they should either go drop it quickly or call for a backup.

When dropped, it creates a slowly-expanding AoE indicated by a thin red ring on the ground that deals massive damage to anyone standing in it. The ring expands to a range of 900 before disappearing.
It is imperative that the tagged player runs away from the group immediately. Where they drop the poison depends on which strategy the group is using to give themselves playable space.
For both the circle strategies, the tagged player should run in the direction the group came from and drop it against a wall. Since most groups go counter-clockwise around the cave following the Imbued Mushroom spawns, you will likely run clockwise to drop it off.
You’ll generally want to drop it as far back as you can in the currently cleared space. If you go too far back, the volatile poison may still be there when the group circles around to that spot again. At the beginning of the fight, since there is no cleared space available, the first person who receives volatile poison should stay at the cave entrance and drop it off there before moving on with the group. Never drop it where the group is going next or there will be big trouble going forward.
If you’re using the center strategy, the player will have to  Dodge through some of the green poison on the ground to drop it off. They may need healing on their way back, so healers should try to watch tagged players, and tagged players should communicate if they’re low on health.
For the line strategy, the first person who receives volatile poison should drop it at the cave entrance as in the circle strategies. After that, they should be dropped behind the group, as close to the previous volatile poison AoE as possible so that they overlap.
For the no mushrooms strategy, your tagged players will need to move out deep into the green poison area to drop it off. They will likely go Down on the way back; groups using this strategy usually have a  Druid use or a
  Scourge with ready to get the player resed and on the group again.
As explained above, eating the first Imbued Mushroom wakes up Slothasor, starting the fight and causing a rock wall to form at the entrance, closing off the area. Like Sabetha, Slothasor does not have a  Toughness tank. Instead, it randomly chooses a player and
  Fixates on them. The fight does not have defined phases, instead, it uses mechanics or gains new attacks based on its health percentage or the time remaining.
Tells: Beep audio cue on tag, purple diamond icon overhead (), purple crosshairs icon on effects bar ( ), on-screen message: “An enemy is fixated on you.”

As soon as Slothasor wakes up, it will Fixate on a player and walk toward them. Besides the personal tells listed above, everyone else will see the on-screen message: “[Player name] is currently fixated.”
When you’re Fixated, your job is to face Slothasor away from the rest of your squad and move it to the next tanking location when the area is clear. Don’t follow too closely behind the friendly slubling player, but move intuitively and pay attention to your squad leader if they request you move or face Slothasor in a different direction. Everyone else should be stacked behind the boss.
Slothasor will Fixate on a new or possibly the same player every 30 seconds. Fixation will also change immediately if the Fixated player is Downed,  Defeated, or eats an Imbued Mushroom.
Slothasor uses an auto-attack that does light damage and can be out-healed. The real danger Slothasor poses to the Fixated player is when it uses  Halitosis, a cone-shaped frontal flame breath that deals damage and inflicts one stack of burning each second for eight seconds. To avoid it, Dodge into the back of his hitbox, and then when the attack is over, run or Dodge back out. He will glow white before and during this attack and always do it facing the Fixated player. If the group is moving when the boss stops to use this attack, other players may be in the line of fire and should be prepared to Dodge out of the way.
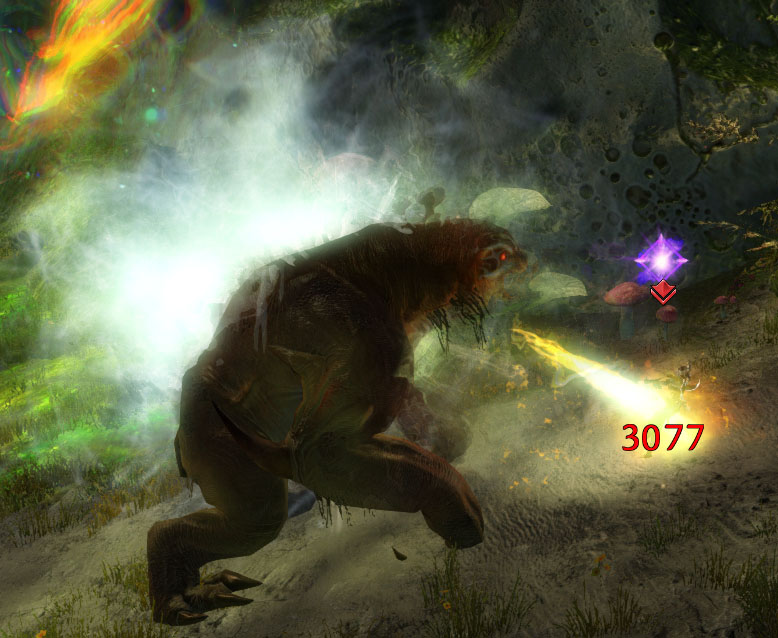

At 6:45, Slothasor will start pounding his fists on the ground. This spawns three consecutive dark blue and gold AoE circles under each player’s feet (about one every half a second). After all three circles have spawned, they do damage and  Knockdown each player standing in them for five seconds. Since they appear so rapidly, the AoEs might seem to impact all at the same time, but the impacts occur in the order the circles spawned.

The best way to handle this attack is to have everyone stop moving when it begins and Dodge after the third circle spawns. All the circles will overlap in a small area, giving everyone more space to Dodge out and avoid them. If you’re on the move as the circles spawn, they cover more area, making it likely someone will run or Dodge out of their own circles and into yours.
The trick is learning to time your Dodge. Some players like to count the circles as they appear, but depending on the amount of visual clutter, this may not be possible. Others like to count to three and then Dodge. Experiment to find out what works best for you.

Fighting is tough and sometimes you need a nap, so says Slothasor. Every 20% and once again at 10% health, he will lie down on the spot, curl up and go to sleep. At this point, he gains  Narcolepsy: he no longer takes direct damage at all and will cleanse all conditions he had before falling asleep. He can receive new conditions/stacks while sleeping, but they will tick for zero damage while he is invulnerable.

When the lying-down animation ends, Slothasor's defiance bar will unlock. It’s important to wait for the defiance bar to unlock and not CC too early. If the bar is not broken, the boss will remain Invulnerable and stationary for a full two minutes.
Breaking the defiance bar causes Slothasor to wake up and roar, inflicting  Fear on the entire squad for 10 seconds. You can use Aegis, Stability, or Block to avoid being Feared, or else use a Stun Break or Condition Cleanse to escape.
Groups usually rely on a  Guardian's to do this, but a
  Mechanist's ,
  Ranger's ,
  Revenant's (Legendary Dwarf Stance), or
  Tempest's will also do the trick. It’s always handy to have your own skill or trait handy to deal with it, just in case.
Note that Fear counts both as a control effect and a condition, so condition removal or conversion will Cleanse it, but any skills must have an instant activation time, otherwise, you won’t be able to cast them while Feared. An  Elementalist's is one such example. A
  Firebrand's and
  Mesmer's work as well.
If you can’t escape the Fear, it’s likely you will run into the green poison area or a volatile poison and go Down. Unless someone has a Downed pull handy, you will probably also die there since it’s dangerous for your squadmates to venture deep into the area to resurrect you.

Also called: coconuts, wet dog
At 50% health, Slothasor gains a new attack called  Spore Release. He will put his head down, arch his back, and begin shaking. This releases a series of projectiles that do damage and inflict five stacks each of
  Bleeding,
  Burning, Poison, and
  Torment. These projectiles cannot be Reflected or destroyed but you can Dodge,
  Evade, Block, or go Invulnerable. If you Dodge, go toward Slothasor's hitbox since the projectiles have a travel time and arc outwards. He will use this attack every 45 seconds unless it is asleep or in the middle of another attack animation, in which case it might be delayed.

Some players like to give themselves Invulnerability or  Distortion and continuously jump inside Slothasor's hitbox to absorb the majority of the projectiles and protect their allies. Another option is to have a Druid use
(not in Celestial Avatar) on the squad when the attack begins, preventing them from receiving any conditions. Keep in mind that players will still take damage from the projectiles, and although
also pulses healing on allies, on its own, it might not be enough to sustain their health throughout the attack.
Distortion and continuously jump inside Slothasor's hitbox to absorb the majority of the projectiles and protect their allies. Another option is to have a Druid use
(not in Celestial Avatar) on the squad when the attack begins, preventing them from receiving any conditions. Keep in mind that players will still take damage from the projectiles, and although
also pulses healing on allies, on its own, it might not be enough to sustain their health throughout the attack.
This is the most dangerous of Slothasor's attacks as it can Down most of your squad if they aren’t paying attention. Be prepared to resurrect players when the attack is finished. Placing skills such as , , or is also useful to manage the conditions that inevitably sneak through.
If you don’t kill Slothasor within 7 minutes, it becomes  Enraged, does 200% more damage, and no more Imbued Mushrooms will spawn. If you run out of playable space and cannot out-heal the damage from the green poison fields, your squad will almost certainly wipe.
About Phoenix Uprising • Recurring Series • Support the Site • Contact • Editorial Guidelines • Privacy Policy
© 2022 Phoenix Uprising. All rights reserved.
About Phoenix Uprising • Recurring Series • Support the Site
Contact • Editorial Guidelines • Privacy Policy
© 2023 Phoenix Uprising.
All rights reserved.