



Welcome to my guide for the Guild Wars 2 raid event, Siege the Stronghold (aka Escort), the first encounter in Stronghold of the Faithful (Wing 3). This is a detailed guide on the mechanics of the event including various strategies that cater to everyone from beginners to experienced raiders. If you’re brand new to raiding, I recommend reading my Path to Endgame guides first.
Siege the Stronghold is a scripted encounter like Spirit Woods and the Prison Camp. You’ll be breaking into the Stronghold with the help of Glenna, who is definitely not your puppy. It’s often considered one of the easiest raid encounters, but you can still fail if you’re not careful!
The mini-boss at the end of the event,  McLeod, has increased
  Toughness and therefore takes less power damage compared to other bosses, but he’s quite squishy, so power DPS will work fine.
At least one person needs all three of the following masteries, but I recommended that everyone in the squad has  Ley Line Gliding at least.
 Forsaken Thicket Waters mastery. This is used to get through the Tunnel of Respite at the beginning of the event.
 Bouncing Mushrooms mastery. This is used to access the first tower upon emerging from the Tunnel of Respite. Ley Line Gliding mastery. This is used to get from one tower to the next, or for players on the ground to glide up to a previously captured tower.
 Forsaken Magic mastery. This is not necessary but can be useful during the event to take control of the bloodstone turrets and help kill enemies.
 Chilled,
  Cripple, and
  Immobilize: You’ll want plenty of soft crowd control abilities to slow down the wargs.
 Condition Cleanse and/or
  Stun Breaks: The White Mantle cultists can
  Fear you, so it’s handy to have skills or traits to break out, just in case.
 Pulls: Much of the encounter involves killing White Mantle enemies, so you’ll want plenty of pulls and AoEs to kill them with.
 Tower Chronomancer: Most groups will use a Chronomancer to traverse the Tunnel of Respite and either solo capture or their squadmates atop the towers.
The goal of this event is to escort Scholar Glenna through the outer complex past hordes of enemies (thus the ‘Escort’ alias) so she can break down the gates to the inner keep of the stronghold.
Glenna can be attacked and take damage from any source that would damage players during the event. This includes the standard White Mantle enemies, land mines, turret fire, warg bloodhounds, and the final mini-boss. If she dies at any point, the encounter will fail.
Glenna will gain 15 stacks of  Surveilled when the encounter begins. She will lose one stack every second a player is not within 1,000 range of her, and if the counter reaches zero, four White Mantle seekers will spawn and attack her. You should dispatch them quickly because they can easily kill Glenna. If a player returns within the safe range when the counters have started decreasing, they will regenerate.
Everyone will gain the special action skill  Over Here! with a range of 1,500, which calls Glenna to their current location. While moving, her stacks will neither increase nor decrease.
It’s advisable to have a healer babysit Glenna so they can heal her if she is attacked. They can also serve as the primary person responsible for calling her so others can focus on killing mobs and so she isn’t zig-zagging all over the place.
Many land mines are on the path leading up to the inner keep. They have a red circle and a white circle surrounding them. The smaller red circle is their detonation radius; stepping in it will kill players and Glenna as well. The mines are covered in dirt and immune to damage, but stepping inside the larger white circle uncovers them, allowing you to attack and detonate them at range.


Mines will reappear periodically, indicated by an orange AoE circle slowly filling up. If a player or Glenna is standing on the mine when it respawns, it will detonate immediately, killing them.
The White Mantle enemies have  Knockbacks and the cultists, in particular, have a long-lasting Fear, so be careful when fighting around the mines and try to get rid of them as soon as possible. Since the mines are only in the center of the path, have Glenna progress up the side of it as much as possible.
Upon entering the wing, Scholar Glenna runs from a cave to her tent. Approaching her will trigger a short dialogue and then she will wait until your squad is ready to siege the stronghold. Speaking to her and choosing, “Let’s start the mission,” will begin the event. A few seconds later, after another short dialogue, everyone will be put into combat for the duration of the event.
Before the encounter begins, most of the squad can wait at the lowered drawbridge down the path. Your designated babysitter can start the siege and call Glenna over to the glowing white circle at the drawbridge. She will summon a ley line and at least one player can glide across to pull the lever and raise the drawbridge for everyone else. Players can use the ledges back by the tent to jump up and glide to the other side of the bridge before the encounter begins, but Glenna still needs to stand in the circle to make the lever interactable.

You can now call Glenna over to the stronghold’s outer gate. Once there she will place a mine to blow open the doors. Standing on this mine when it detonates damages players, but unlike the enemy mines, players will only go  Down and can be resed.
Past the gate, you will encounter a red orb that spawns the first group of White Mantle. Kill them and then call Glenna over. At this point, the path diverges. Going forward leads players into the Tunnel of Respite, a cave system with mushroom enemies running rampant. Through there, players can access the first tower. You must capture the towers to complete the event, so one or more players have to go this way. The right path is the primary one leading to the inner keep. Glenna must be taken this way.


You only need one player to navigate the tunnel, but if they’re going solo, they should have a portal handy (meaning they’re either a  Mesmer or
  Thief) and plenty of
  Blocks,
  Evades, movement skills, or
  Stealth to get past the mushrooms alone. Remember, every player who enters the tunnel should have both the Forsaken Thicket Waters and Bouncing Mushrooms masteries.
Players in the tunnel will be afflicted with  Toxic Spores, which deals damage over time and reduces healing. Wading through thicket waters gives players with the mastery
  Healing Cleanse, granting healing over time and making them immune to Toxic Spores for five seconds. Players will need to run through at least three pools to clear the tunnel.

The mushrooms in the tunnel have Pulls,  Knockdowns, and do high damage. You can kill or run past them depending on how many players are making the trek.
On the other side of the tunnel, players will find another group of White Mantle that, like the mushrooms, can also be killed or ignored. Players should climb up the overhang and glide over near the bouncing mushroom. If multiple players made it through, you can all take the mushroom as soon as everyone is there and ready. Otherwise, you should wait for the ground team to tell you they’ve progressed as far as they can.
The ground team will branch off to the right, encountering two overlapping mines in front of an archway. Destroy them and leave Glenna under the archway because another red orb will spawn a group of White Mantle in the courtyard. Once you kill them, call Glenna inside near the second archway and destroy the mine outside of it. Leave Glenna where she is for now because there are two more groups of White Mantle on the other side.
Once they’ve been dispatched, you can call Glenna out to either side of the pathway and tell the tunnel team/player that you’re ready to start capturing the towers.
The towers run alongside the pathway. Atop each one is a group of White Mantle and a turret raining bloodstone shards along the path. The ground team can’t venture into cannon fire, or else they’ll take significant damage and be Knocked Back. You can only progress by capturing each tower in succession.

When you bounce up to the first tower, you’ll see White Mantle soldiers and a red capture circle. When the number of players in the circle outnumbers the White Mantle, the circle will turn blue and start to capture. The fewer soldiers and/or the more players in the ring, the faster it will capture. If all the White Mantle soldiers on a tower are killed, another group will respawn shortly after. There is no capture progress bar, but when a tower is successfully captured, the ring will disappear and the Turrets Secured bar in the upper right-hand corner of your screen will fill up more.

When you capture a tower, the turret will cease firing, and anyone with the Forsaken Magic mastery will be able to interact with it. You can use the turret to rain down shots on the ground or fire point-blank to damage enemies still on the tower.

After the first tower is captured, the ground team will be able to lead Glenna farther up the path to the next glowing white circle, defeating waves of White Mantle soldiers along the way. When called into the circle, she’ll channel magic and create a ley line leading from the first tower to the next. She is unable to move while doing this, so make sure you don’t call her to the circle if you think a mine will respawn soon. When she’s done, you can call her back to the side of the path. The tower team can glide to the second tower, capture it, and the process repeats.
There is also a long ley line that grows in length as you cap towers — eventually, it will extend from the base of the fifth tower and take you all the way up to the first. There are a few locations along the way from which you can glide into this ley line in case no player is left up top. The ley line does not spawn until Glenna channels her spell in the first white circle, and the first spot you can glide from is in the initial cannon fire, so there is no way to avoid going through the Tunnel of Respite.
There are a few different methods you can use to capture the towers.

For this method, your squad will stay split up throughout the event, with 2–5 players on the tower and 5–8 players on the ground. If multiple people went through the Tunnel of Respite, you’re already split up. If only one or two players went through the tunnel, you can place a near the bouncing mushroom, glide down, and teleport more players up.
The tower team will kill all the White Mantle soldiers except one to prevent an additional wave from spawning. They can then assist the ground team by taking over the turret. You can employ Pulls or Knockbacks to get the White Mantle out of the ring and capture it even faster.
The group can stay up at all times unless the ground team is having trouble. In this case, you can have one or more people glide down to help, preferably leaving someone who can portal everyone back up on the tower.
This method is ideal for beginners or groups who aren’t in a hurry to complete the event. But remember, if you’re using this strategy, everyone on the tower team should have Ley Line Gliding.

For this method, your squad will overwhelm the White Mantle on the tower with sheer numbers. One of the players who went through the tunnel should be a Mesmer with . They will bounce up onto the tower, place a , and then glide to the ground. Everyone in the squad will teleport up except for Glenna’s babysitter and the player responsible for dealing with the back warg (explained later). Since the portal will need to teleport eight players, a Thief's will not suffice.
With eight people on the tower, it will capture almost instantly without needing to kill any White Mantle, and everyone except the Mesmer can take the portal back down again or glide off the side.
If you’re using this strategy, the Mesmer can control the turret and kill off some of the soldiers up there after the tower is captured. They can also bring and to reduce the cooldown on . Even so, your ground team might have to wait a bit before the third tower if you’re moving Glenna along quickly. To combat this, you can bring another Mesmer with and have them stay up on the second tower instead, enabling your first Mesmer to get their skill off cooldown.
This method is ideal for more experienced groups or those who want to complete the event faster (particularly for the I Can Outrun A... Warg achievement).

For this method, a Mesmer will capture the towers solo. They’ll need a greatsword and a focus at the bare minimum. Upon reaching a tower, they’ll place a (Focus 4) in the middle of the cap circle and use to group up the White Mantle. They’ll then weapon swap and push them out of the circle using (Greatsword 5). The tower will cap instantly. The Mesmer can use the turret to kill enemies on the tower.
I recommend the Mesmer still bring and possibly and just in case they’re overwhelmed and need help from the ground team. Or they can also bring skills such as and to Stealth after capturing a tower instead of killing the soldiers. Having some Toughness and  Vitality can help them survive the mobs as well.
Since the first three towers are connected by a curtain wall, the Mesmer can jump onto it to line of sight (LoS) enemy attacks. They’ll be able to jump back up and retake the ley line to the tower if necessary.
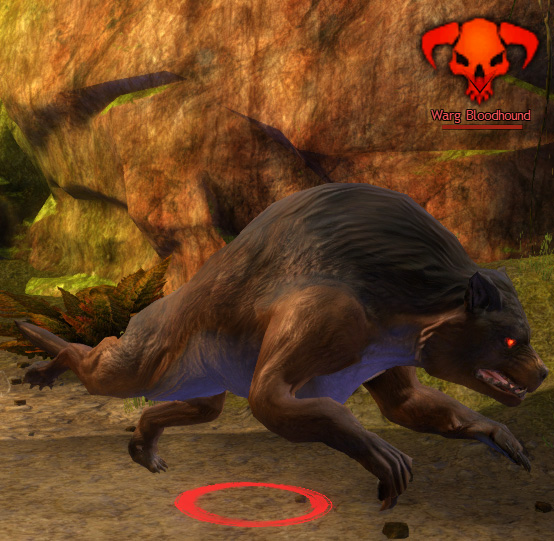
After you capture each tower, two warg bloodhounds will spawn, one at the inner keep gate and one at the entrance gate where the squad started. These wargs will sniff out and run up/down the path toward Glenna. If they reach her, they are capable of killing her in about two hits so they need to be controlled and killed. They are susceptible to soft CC, but immune to hard CC and it will make them run faster, so avoid using any near them.
Typically groups will dedicate one player on the ground team with high burst damage or ample access to Immobilize, Cripple, and Chilled to deal with the back wargs. This player will backtrack to kill these wargs while the rest of the group advances with Glenna in tow.
The front wargs can be dealt with as they get closer since you can’t very well walk into turret fire to kill them. It also helps to have control for these, since you’re running toward them as opposed to away. If your babysitter is a  Druid, they can use , , (Staff 4), (Celestial Avatar 5), and (
 Jacaranda pet skill) if a warg gets close.
Always keep an eye on Glenna’s positioning, don’t stray too far from her to kill the warg, and if you must call her away, be careful of mines and potentially the other warg.
After capturing the fifth tower, McLeod the Silent will spawn on the platform outside the gate to the inner keep. The tower team and back warg player can rejoin the ground team at this point. If any players were  Defeated during the event, you can have one or more people go resurrect them as everyone else engages McLeod.
Glenna’s stacks of Surveilled will no longer increase if she’s left unattended, so groups usually leave her on the landing between the two sets of stairs. More wargs will spawn as you kill McLeod, so if you want to play it extremely safe, you can leave her farther away, but this location is sufficient.
McLeod's main attack is similar to a Mesmer's and it stacks  Confusion, so it is possible to go Down to this attack or damage yourself. Condition Cleanse and moderate healing will make this a non-issue. He also teleports to the farthest player, Knocking Back everyone around them, so make sure everyone is stacked. He may also teleport up to the last tower if someone is still on it when he uses the skill.
Every 25% of his health, McLeod will split into two clones, one with a red symbol over its head ( Crimson Attunement), and one with a white symbol (
 Radiant Attunement). Players will also receive matching symbols, evenly distributed based on the number of living squad members (even those not present at the boss). You can only damage the clone with the same attunement as you have.

When you’ve killed both clones, McLeod will return and a warg will spawn at the gate. Like the others, it will zero in on Glenna. Some people choose to stack near the gate so it can be immediately cleaved, but where your squad stands doesn’t matter as long as you prevent the warg from reaching her.
When McLeod dies, any existing wargs will despawn. You can now retrieve Glenna and lead her up to the white circle at the gate. She’ll place another bomb and you’ll gain access to the inner keep and your next challenge, the Keep Construct.
About Phoenix Uprising • Recurring Series • Support the Site • Contact • Editorial Guidelines • Privacy Policy
© 2022 Phoenix Uprising. All rights reserved.
About Phoenix Uprising • Recurring Series • Support the Site
Contact • Editorial Guidelines • Privacy Policy
© 2023 Phoenix Uprising.
All rights reserved.