


Welcome to my guide for the Guild Wars 2 raid boss,  Deimos, the fourth and final encounter in Bastion of the Penitent (Wing 4). This is a detailed guide on the mechanics of the fight including various strategies that cater to everyone from beginners to experienced raiders. If you’re brand new to raiding, I recommend reading my Path to Endgame guides first.


Deimos isn’t a difficult boss in theory, but the fight is lengthy and a lot can go wrong. This is one of the first bosses with tricky individual roles, and it can serve as good preparation for Wing 5, where a lot of the roles make or break the fight. Power DPS is great due to a buff you get during the fight, but condi DPS works well too as Deimos only goes  Invulnerable once at 10% health.
Gliding:  Glider Basics mastery. Every player needs this to get to Deimos' platform.
 Hand Kiter: This is a special role responsible for keeping the
  Soul Feast mechanic away from the squad. Usually, the kiter will want specialized gear, although some builds can use healing gear without issue. This player usually can’t contribute much to killing Deimos.
 Saul the Thief and Saul the Drunkard.
 Aegis or
  Blocks: These will serve as the primary or backup method to avoid Deimos'
  Mind Crush ability.
 Chill,
  Cripple, and
  Immobilize: You’ll want movement-impairing conditions to prevent adds from reaching the prisoner during the pre-phase and later in the fight.
This is the mechanic the Hand Kiter will deal with. Since it’s difficult to describe the challenges of this role without understanding the basic aspects of the fight, this is a general description of the mechanic for all participants. A detailed section on how to hand kite will follow the main guide.
A few seconds after the main fight begins, Deimos will start to put small red puddles of grasping hands under the player who is farthest from him. These come in waves: one puddle every second for five seconds. A six-second interval follows with no hands, and then a new wave begins.

The farthest player is only checked when the first puddle in a wave spawns, so if someone is farthest away when it begins, but then moves closer to Deimos than someone else, the next four puddles will still spawn underneath them.
The hands do damage when they spawn and pulse damage every second they persist. At each 25% health threshold, when Saul’s vice teleports in from the demon realm, all existing waves of hands on the platform will move toward Deimos on a straight trajectory, meaning several stacks will converge as they get closer. They still pulse damage, so nearby players should be careful. They will disappear five seconds later.
Any grasping hands that Deimos walks over will give him a stack of  Devour, which increases his outgoing damage by 2% per stack. He will lose the buff when the hands disappear around each 25% threshold. This means you don’t have to worry about him gaining stacks as the hands move in as they’ll instantly wear off.
There is a cutscene after the pre-phase that you can skip by speaking to Glenna before gliding to the platform. If you fall from the platform, you will die.
The platform has a prisoner in the center shackled there by four spectral chains. These chains are attached to gargoyle statues. Before the fight begins, lingering in front of one of these statues for too long will cause them to  Fear players toward the center, starting the fight prematurely. Make sure everyone stands between them as you place markers or assign roles.
The fight takes place on two planes: the mortal realm and the demon realm. The demon realm is an almost identical copy of the main platform, just darker and obsidian-like in appearance. The goal of the pre-phase is to go to the demon realm, destroy the statues, and free the prisoner. This will anger the demon, Deimos, who keeps watch, and incite him to come to the mortal realm to fight.
When the fight begins, a random player will receive a shrinking green PBAoE. The message “The Eye of Janthir has chosen <player name>,” will also appear on the screen for the whole squad as an additional indicator. When it disappears five seconds later, it will teleport any players inside to the demon realm, known as ‘going down’. You’ll want to keep a couple of players up on the main platform, preferably those with plenty of Immobilize. A  Heal Druid or
  Soulbeast Hand Kiter with and/or (
 Jacaranda pet skill) works well.

The gargoyle statues (Demonic Bonds) here are attackable, but an untargetable shade of Deimos replaces the shackled prisoner. Players should split up and attack the statues. When you break one bond, everyone will be transported back to the mortal realm. You’ll want to communicate about how low your statue is and potentially stop at ~10% (or higher if you do condition damage) to give others a chance to catch up.
If you fail to break all the bonds in one go, another player will receive the AoE five seconds later and you can go back to try again. Conditions on a statue will continue ticking, so it’s possible for a chain to break when you’re up top. If you have a statue targeted when you return, you can monitor its ‘health’ and inform players if it needs special attention when they go back down. Ideally, it only takes one or two trips to the realm to break all four bonds. Three or four isn’t the end of the world, but it does waste time and can stress those on the main platform.
When players arrive in the realm each time, Deimos will choose a player and continually slam his mace at them, indicated by an orange triangular telegraph. This does little damage but  Knocks Back anyone caught in the AoE, almost certainly sending them flying off the platform. The chosen player should stand between chains to avoid trapping others in the AoE. If they are having trouble
  Dodging the attack, they can stand close to Deimos in the hope he won’t knock them back far enough to die.
Those in the demon realm will also have a  ?? debuff, which works similarly to Unseen Burden in the Cairn fight. Players accumulate more stacks the longer they stay and each stack increases ticking damage and reduces movement speed.
You should reset the encounter if you lose someone in the pre-phase unless you want to give others the opportunity to see the mechanics.
In the mortal realm, spirits called Greed and Pride will spawn on the outside of the platform, walk to the Shackled Prisoner and explode, doing damage to him. The Prides are larger, have more health, and do 20% of the prisoner’s health, but there will only be one at a time.
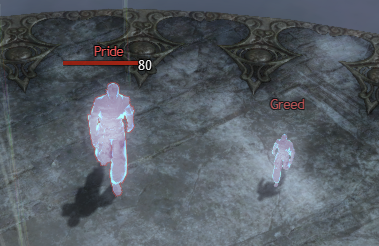
Both adds are susceptible to CC, but like the wargs in the Siege the Stronghold encounter, they will run faster if players use hard CC. Players will want to permanently Immobilize the Prides while killing as many Greeds as possible. If a Pride gets close to the prisoner, you should kill it.
If the prisoner dies during the pre-phase, you will fail the fight and must reset it.
When you break all the chains, the prisoner,  Saul D’Alessio, will be freed as an ally and Deimos will appear in physical form in the mortal realm.
Saul will periodically throw a banner to the farthest player ( Hand Kiter), which heals anyone in range for 5% of their maximum HP every second. It lasts for 20 seconds.
He will also cast  Unnatural Signet on Deimos every minute. This debuff increases incoming damage by 200% for 10 seconds, so players should save or delay their major bursts for this period.
Although most of Deimos' attacks do not affect him, if Saul dies during the fight, you will fail and must reset.
Deimos aggros on the player with the highest  Toughness. Always check to make sure your designated tank has more Toughness than your Hand Kiter before beginning.
Your tank should position Deimos in the center, facing away from the group as usual. Deimos' basic attack is Mace Smash, which deals moderate damage in a frontal cone.
He will alternate using this and  Annihilate, a cascading attack that does moderate damage and inflicts
  Vulnerability (25 stacks) and a Knockback to anyone hit by it. This is indicated by a large circular orange AoE with triangular slices (thus why it’s sometimes called the pizza attack). Annihilate impacts each slice in quick succession, starting from the front of Deimos fanning out toward his back.


You can Dodge or Block this attack, but  Stability does not work. The biggest mistake people make when trying to avoid it is mistiming. The slices will appear one by one, the last showing up at the peak of his backswing, and then he slams both maces down, triggering the domino effect. If you’re in front of Deimos, you can Dodge or Block almost immediately, but those to his side or back will need to delay.
Starting at 90%, Deimos will use Mind Crush every 35–40 seconds. He will swing his maces in a circle four times and then unleash a devastating attack that will  Down any unprotected players on the platform. At the beginning of the five-second channel, Saul will cast
  Form Up and Advance! on all allies within 1,200 range, increasing their movement speed. He will also shout, “Stand in the ward! Quickly!” and create a blue bubble of protection in the center of the platform, similar to a
  Guardian's . Standing in this is the easiest way to avoid Mind Crush.

You can also Block Mind Crush. Invulnerability does not work, but similar effects that prevent or invert damage, e.g. do. The tank and Hand Kiter will always have to use a Block or one of these effects to avoid the attack, but those who don’t want to move or interrupt their rotation later in the fight may use them too. Squads may choose to bring AoE Blocks such as a Guardian's ,  Mechanist's , or
  Ranger's (
 White Tiger pet skill).
Anyone not in the barrier will be afflicted with Weak Minded, whether or not they avoided the attack. This debuff deals 70% of a player’s maximum HP over 10 seconds.
At 75% health, you’ll have to confront one of Saul’s vices in the demon realm. A shrinking green circle will appear under a random player who is not the tank or the Hand Kiter. As in the pre-phase, the squad will see the message: “The Eye of Janthir has chosen <player name>.” All the DPS players should go to the demon realm. If you have two healers, one can go down, while the other can stay up to support the tank or heal the kiter if they’re in trouble. If you only have one, I recommend they go down with the group, at least in this phase.
Saul’s first vice is the Thief. His defiance bar will occasionally unlock. If not broken quickly, he will  Steal Boons from everyone in the same realm. At 50% health, everyone in the demon realm including the Thief will be teleported back to the mortal realm.

While in the demon realm, players will still receive the ?? debuff as before, which is why all the DPS players should go so weakening the Thief doesn’t get too dangerous or time-consuming. If for some reason all players in the demon realm die, the Thief will still teleport to the mortal realm after a time.
Back in the mortal realm, players should watch the incoming hands and prioritize killing the Thief. Left unchecked, he will Steal Boons, threatening the tank and Hand Kiter if they rely on Aegis to avoid Mind Crush. Having  Protection and
  Regeneration stripped can also make it difficult or impossible for the kiter to sustain themselves.
When the group returns, demonic tears will start to appear around the platform. They are indicated by small white AoE circles with swirling energy inside. These tears spit out bloodstone-like projectiles, like the ‘starfish’ on Cairn. Each projectile is aimed at Saul or a random player and does moderate damage.
They can be closed by a player walking over them. That player will receive  Tear Instability, preventing them from closing another tear for one minute. This player will also have a green skull icon over their head (
 ) and a cyan border in the squad UI.


Leaving the tears open for too long can put undue pressure on your healer(s) and Hand Kiter and remove Aegis, possibly causing people to go Down to Mind Crush. Everyone should keep an eye out and run to close them as soon as possible.
The tear spawn rate is dependent upon how many living players you have in the realm, so don’t worry about them getting out of hand if you’re trying to low-man the fight or a couple of people die.
Also called: blacks, oils
Starting at 60%, Deimos will drop an orange AoE on the closest player who is not the tank every 15 seconds. Three seconds later, the orange AoE will turn black with a red border. This AoE deals damage and expands rapidly every time it hits a living player until it takes up ~80% of the platform. Downed players, pets/summons/minions, and Saul will not cause it to expand. Each AoE disappears 30 seconds after it spawns.


This is the most dangerous mechanic and will likely cause a wipe if one expands too much. You can recover if everyone is quick on their feet, but you may lose people in the process. Note you can Dodge or  Evade through the AoE, but you should neither rely on nor use this unless necessary. Players also need to be extra careful about being hit by Annihilate, as they may wind up in an oil.
Squads sometimes assign an oil kiter to bait their placement. There are a couple of different strategies that you can use.
Arc
The tank will bring Deimos to the outside of the platform, remain stationary, and the kiter will place the AoEs around them in a rough arc/semicircle pattern.
Hand Kiter will never be in danger of being hit by Annihilate and has plenty of room to move. Blocks to avoid Annihilate. The oil kiter needs to be aware of how large the AoEs are to give the tank room.Line
The tank will go about halfway to the outside of the platform and move in a straight line as the AoEs are placed. They will return to the initial position when the third has been placed and the first has disappeared.
Dodge Annihilate from all angles. The Hand Kiter has less room.Center
The tank will start in one of the intermediate directions about ⅓ of the way from the center (usually the squad leader will put four markers in the positions). They will move to the next when an AoE is placed, making a rough square.
Mind Crush. Dodge Annihilate from all angles. AoEs have a high risk of covering the entire bubble if the oil kiter isn’t where they should be.As an oil kiter, your job is not to be with the tank the whole time, but to be with Deimos the whole time. Since Deimos can drop an AoE and get stuck in animations doing other attacks, e.g. an Annihilate followed by a Mind Crush, you may need to stand just outside of one AoE to get the next one to drop in a good spot.
An oil kiter is usually a healer and/or someone with their own Block so they don’t have to go to the bubble to avoid Mind Crush. If they don’t have any way to mitigate it, usually the tank will bring an AoE Block or Aegis application such as a  Chronomancer's or Guardian's .
At 50% health, you’ll have to confront Saul’s second vice in the demon realm. This time you might want to leave the oil kiter up top. They can help close tears or heal the tank and Hand Kiter if no one up top can close them. They can also drop oils in safe locations (aka not in the middle) and ensure the Hand Kiter isn’t strapped with both hand and oil kiting at the same time.
Saul’s second vice is the Gambler. He will occasionally disappear and summon three clones, one in each cardinal direction. Players need to find and defeat the ‘real’ Saul, which is the one wielding . The clones all use the staff, the one the allied Saul uses during the fight.

All clones will shoot AoE projectiles toward the center of the platform, meaning everyone should Dodge out and stand behind the real Saul as they kill him. When you defeat the real Saul, the Gambler will spawn in the center again.
This time, tears will also spawn in the demon realm. Players can run over them like the ones up top. However, these aren’t as important as those in the mortal realm, so players without the debuff can ignore them unless there are three or more up.
At 50% health, everyone in the demon realm including the Gambler will be teleported back to the mortal realm. Players should watch the incoming hands and focus on killing the Gambler. The longer he is up, the more he’ll split up. This is dangerous because players will probably move away from each other looking for the right one, and will take a lot of damage if they need to go into the bubble for Mind Crush while he’s split.
Starting at 40%, the Greed and Pride spirits from the pre-phase (except much fewer in number) will start appearing on the outside of the platform again and walk toward the allied Saul. If they reach him, they will explode as before and damage him. You can generally outheal the damage the Greeds do, although if you can kill or cleave them, you should.
Prides are the biggest threat. If you have enough Immobilize, I recommend you try to stall them rather than kill them, keeping in mind that Saul will move with Deimos. When you kill a Pride, another will spawn immediately, so try to keep them controlled, killing them only when necessary.
Remember that since Saul is an NPC ally, healing and boons will prioritize players and pets/summons/minions first. If Saul is low in health, try to have everyone except your healers get away from him so they can heal. This isn’t always possible, considering the wonky way Deimos moves and the fact that Saul will sometimes stubbornly stand in a  Rapid Decay field attacking him, but do your best to keep him topped up.
Greeds and Prides also damage players when they explode for little damage. This means, like the tear projectiles, they can also strip Aegis, so be very careful around them during Mind Crush.
At 25% health, you’ll have to confront Saul’s final vice in the demon realm. This time, your oil kiter should stay up, but if Saul is low, consider having a single DPS stay up to help control Greeds and Prides too.
Alternatively, you can ‘sacrifice’ the player who gets the green circle, sending them down alone. This player will run around, kiting Saul’s last incarnation, closing tears if possible, and surviving for as long as they can. If your squad has high DPS, they should be able to reach the 10% threshold up top quickly, and will be able to join the solo player so they don’t have to survive for too long in the demon realm. If the sacrifice dies, the third incarnation of Saul will appear in the mortal realm, and the squad might need to refocus and kill him.
Saul’s third vice is the Drunkard. His defiance bar will occasionally unlock. If not broken quickly, he will teleport random players in the same realm to a haphazard location on the platform. This doesn’t matter so much while he’s in the demon realm, but it can have a mess of consequences when you return to the mortal realm at 50%. The window to CC him is shorter than Saul the Thief in Phase 3.
Consider mopping up another tear or two than you would have in the last phase because the entire squad will be returning to this realm shortly and any tears left over will persist.
Back in the mortal realm, finish off the Drunkard. This vice has the potential to make things spiral out of control if people are teleported, ranging from landing in a Rapid Decay AoE to being forced out of Saul's ward. In case it wasn’t clear, CC and kill the Drunkard fast!
At 10%, Deimos will go Invulnerable and have a chat with Saul. Everyone will be teleported to the demon realm where a giant epic-rank Deimos will appear on one side of the platform. His hitbox is similar to a world boss in this phase but traps will still trigger.
Deimos no longer uses Annihilate or Mind Crush in this phase, but Soul Feast and Rapid Decay still occur. Deimos will repeat an auto-attack chain of slamming his left fist, right fist, and then both fists down at the same time. The first two do damage and cause a Knockback, while the third is a cascading shockwave that can Knockback players several times.
Players should try to stand on one side of the platform unless an oil spawns so they only have to Dodge one hand and the double slam instead of all three. Stability is useful here, even in small amounts, because oil placement may still force players to move. It’s easy to be Knocked Back into an oil, so be careful.
Do not get cocky, as getting to this phase does not net you a guaranteed win. I’ve experienced several pulls in which squads have wiped below 10%.
If you don't kill Deimos within 12 minutes, he becomes  Enraged and does 200% more damage.
First things first, who can hand kite? The loose answer is basically every profession, but some have it a lot easier. I recommend a  Herald,
  Firebrand, Soulbeast, or
  Tempest. All have good mitigation and several methods to avoid Mind Crush. These include:
Herald: (Staff 3), (Shield 5), or (Legendary Dragon Stance) Firebrand: any Aegis application, (Mace 3), (Focus 5), or
Soulbeast: or beast skills and
Tempest: , (from ), or
Second, where you hand kite depends on your squad’s strategy for moving Deimos away from Rapid Decay fields:
Annihilate. Deimos consistently. You’ll need to be able to Block or Dodge Annihilate. This is more of a speed-clear strategy and isn’t as reliable or safe as kiting on the outside.Third, how to survive?
 Boon Duration,
  Healing Power, and probably a little (or a lot of) Toughness. Some mix of Harrier’s, Magi’s, and Minstrel’s gear is optimal. Down if you are hit by Mind Crush. Note that Soulbeasts already have that does the same thing, but they will still get
  Barrier from the rune. also works well. Protection and Regeneration uptime as possible. Block(s) you’ll save for Mind Crush and what you’ll use for an oh shit! moment if you mistime something, or your squad isn’t attending to Saul’s vices as they should be. Weak Minded debuff after Mind Crush. Dodge to the side as the fifth puddle is being placed to avoid eating five packets of damage at once. You can also strafe to the side while using a channeled Block or Invulnerability skill.
My final tip is during the 10% phase, you should not stand on the edge but move in a few steps. This phase can be finicky in that if you stand too far from Deimos, you won’t get Soul Feast aggro. The hands will also never move in again, so you just need to keep them off your squad.
About Phoenix Uprising • Recurring Series • Support the Site • Contact • Editorial Guidelines • Privacy Policy
© 2022 Phoenix Uprising. All rights reserved.
About Phoenix Uprising • Recurring Series • Support the Site
Contact • Editorial Guidelines • Privacy Policy
© 2023 Phoenix Uprising.
All rights reserved.